These guides are licensed

Attribution-NonCommercial CC BY-NC
These guides are licensed
Attribution-NonCommercial CC BY-NC
Backing up your website isn’t something to overlook. Having a backup of your WordPress site can help in many situations. When you set up your website, it’s likely you automatically set up backups. There is some documentation on backups and storage on ET&S’ main Knowledgebase.
Backups do take up some amount of storage (remember new accounts get 1 GB of space – to read more about storage see the section titled Quotas) so if automatic backups are turned on, you’ll want to go in and delete old ones from time to time. See the link above for more information.
An example where a backup can be helpful is if you run into an error that breaks your site or an update affects its functionality, you’ll be able to roll back the saved version.
To use backups in WordPress click on My Apps and then My Backups

Click on the arrow to restore a previous backup. Remember – this will be a copy of the site saved at the point in the time noted at the date information on the backup!
The downwards arrow will also allow you to download a copy of the backup.

To delete a backup click the x. Remember we do recommend keeping at least 1 backup of your site around.
This will bring you to a page and just be sure to click the Delete button.

To create a manual backup go to your My Applications page. Click on the arrow.

When you’re brought to the next screen make sure to click on Backup. You do get a choice of using your web hosting account or Google Drive for your backup. Note in order to use Google Drive you would have to sync with your Google Drive account.

If you would like to turn off automatic backups, follow the article on our ET&S Knowledgebase.
Part of being a responsible website administrator is keeping your website up to date. In order to keep your website secure and functional, it’s important that your periodically run updates. It’s a good idea to set yourself reminders maybe in your digital calendar or to-do list to make sure to do this, perhaps at the beginning of each month. You will have plugins, themes, and WordPress itself updated. If you notice something hasn’t had an update in a long amount of time (typically 6 months+), it’s generally good to consider a new theme/plugin/resource at that point.
Look at the backups on your site, and before you update consider creating a new backup in CPanel.
First update the core of WordPress and then your plugins and theme.
With the writing settings, you’ll find some things to consider.
| Formatting | Formatting Convert emoticons like :-) and :-P to graphics on displayWordPress should correct invalidly nested XHTML automatically |
|---|---|
| Default Post Category | Choose a default category for your blog posts. |
| Default Post Format | If you had a default format for your blog posts you’ll find options here. |
| Default Link Category | Blogroll |
This setting allows you to post using your email address. This may be useful if for example you’re in a remote place and posting using your cell phone.
Once you’ve installed WordPress, you’ll see a view of your WordPress C-Panel page with a few links to your site. In order to edit, you’ll want to click on the hyperlink including wp-admin. The wp-admin URL is your way to login to your WordPress dashboard to begin to work on the backend of your website (i.e. where you create all of your content).

You can either use the WordPress username and Password you set up during the install process to go login directly to your website.
You would visit your wp-admin link i.e. “yoursite.plymouthcreate.net/wp-admin”
Then enter the WordPress Username and Password you created when you installed WordPress.
or if you visit plymouthcreate.net and click on Dashboard, you can login from there.
When you see your cPanel Dashboard click on WordPress then My Applications to find your WordPress installations and your wp-admin link. Click on the wp-admin URL to enter your WordPress Dashboard.
You can also click on MyApps from the cPanel Dashboard to find your WordPress installation and wp-admin link.
Please see our main Support page for additional support and continued information for Plymouth Create. From here you should have the skills to begin to build a functional and exciting WordPress website.
The setting we will look at here is your blog “title” and “tag line”. It is located under Settings > General. Once you’re on the General Settings page, you can give your blog any title you want. You can also give your blog a tagline, which can be a short description of the blog.
When you change the Blog title and tag line, they will show up at the top of your site. Depending on what theme you use, the title and tag lines will show up in various places. In the case of some themes, they might not show up at all depending on whether they allow custom configurations. We won’t worry about that for now. If you use the default theme (currently “Twenty Twenty One”), the blog title and tag line are both in the center-left of what’s called the header of the site.
There are more settings on the General Settings page, such as setting the administrative email account, time zone, date format, etc. Change those to whatever is appropriate for your site and geographical location.
When it comes to WordPress, customizing the look of your site is simple and straightforward. When you install WordPress, the default (or pre-set) theme is called Twenty Twenty-Five (as of WordPress version 6.7). It is a very customizable theme that is built for the block editor. You can read more about WordPress version 6.7. You can read more about theme Twenty Twenty-Five.
In addition to Twenty Twenty-Two, you’ll have other themes available to you. (What themes you have depends upon if you did a default WordPress installation, or if you installed a special package.) If Twenty Twenty-Two doesn’t meet your needs, you can activate another theme on your site or install a completely new one.
That’s all you need to do to change the look of your site with a new theme.
If none of the themes that were provided when you installed WordPress are what you’re looking for, you can always search for and install other themes from the WordPress Theme Repository.
The primary activity that you’re likely to be doing on your WordPress site is publishing content. The content could be text you write, pictures you take, videos or audios (which may be hosted on another site), or other media that you’ve found elsewhere on the Web. WordPress makes it very easy to publish media content of all types, whether hosted on your actual Web server or elsewhere.
Out of the box, WordPress provides two primary content types for you two work with: posts and pages. If you read blogs or have ever written for a blog before, the concept of a post is probably a bit familiar. Posts often are content that appear on your blog in some kind of scheduled way. They usually are presented on your site in reverse-chronological order. Posts might be what you use to share your regular thoughts, reflections, or ideas about a topic. Posts make up a kind of “river” of content that you’re producing as part of your blogging activity.
Pages usually correspond to our more traditional concept of what makes up a Web site. Pages are presented outside of the “river” of content that are posts. They are more likely to stand alone and be organized according to a traditional hierarchy. Pages might be content that is less frequently updated or changed.
If you were using WordPress to build a business Web site with a lot of information content, you would probably use Pages. If you added a feature to that site where you started to advertise special events or news, you would probably use Posts.
A few other things to know about Pages vs Posts:
Upon occasion, you may want to include media (images, audio, video) in your site’s posts and pages. There are generally two approaches to handling media in WordPress:
Uploading: You can upload the files into your site’s Media Gallery and then link to them in your posts/pages. This works very well for images, and when you take this approach for images you have the added benefit of being able to make use of WordPress’ built-in (albeit rudimentary) editing tools. Also, when you upload images to WordPress, it automatically creates different sizes that you can use, as needed.
Embedding: You can embed media from other sites easily in WordPress. Embedding an image just means providing a URL to it’s location elsewhere on the Web. Instead of uploading it to the server, WordPress grabs that image from the external source and displays it on your post/page. However, with this approach you lose your editing capabilities as well as the resizing feature. Embedding audio and video from external sources becomes easier with every version of WordPress it seems. These days, you can embed video and audio from many external services (YouTube, Vimeo, SoundCloud, complete list here) by simply placing the full URL of the audio/video location on it’s own line in your post/page. Our general advice is to use externally hosted media whenever it makes sense and works. This is usually the case when you need to use audio or video; without plugins, well-presented audio and video in WordPress is tricky. For images, if you need to do basic editing and/or require different sizes of images, upload them to your site. Otherwise, consider referencing them from another location (your YouTube account, for example).
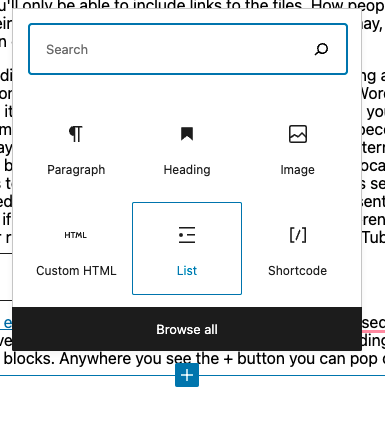
WordPress now uses Gutenberg editing to edit Posts and Pages. This is a block-based editing system. You can read about Gutenberg at the link above and you can also read about the functionality of the editor here. Every time you hit the return button, whilst building your site you will have the opportunity to add new types of blocks. Anywhere you see the + button you can pop open the list of block options. You can browse or search for a particular block setting. You can re-organize these blocks and use unique blocks through plugins.
WordPress is a very flexible platform for creating full-blown websites, not just blogging sites. This page will show you how to change the “front page” of your website.
As we have said before, WordPress provides two primary content types for you two work with: posts and pages. Posts, as in blog posts, are a somewhat complex form of webpage. Each blog post gets published in reverse chronological order, on the front page of a WordPress site. You write a new post, and it gets published at the top of the front page. Pages, are a more static form of content. They are additional areas to put information that doesn’t change much. So what if you would like to make the front page of your WordPress site based on a page instead of your blog posts?
Start at the Dashboard.
Navigate to Settings > Reading.
Normally, the front page displays your latest blog posts. What we want to do instead is select a Page from the website. Obviously this page has to exist before you can select it. Select the “A static page” radio button and choose the About page from the Front page drop-down menu (an About page was created for you when you installed WordPress).
OK, great. Click the Save Changes button and now you will have the About page as your Front page. Edit it as you see fit and provide a good welcoming page for your visitors. But wait. What will happen to your blog posts? Most people will want them as the “dynamic” part of your site.
First, create a new Page and title it Blog (you can title it whatever you want but Blog is common and descriptive). Leave the page blank (don’t type any text in the edit box) and Publish it. Now go back to Settings > Reading. Under the static page area choose Blog from the Posts page drop-down.
Click the Save Changes button. Now your “home” page will actually display the About page. You will also have a Blog item in your menu (depending on your theme, you may have to customize your page display to see pages).
If you click on the Blog menu item, you will then see your blog posts. Notice the /blog added to the web address.