
General Information
Welcome!
Welcome to Plymouth Create. We’re excited to see you here. This guide is built for Beginner users of Plymouth Create to help them get set up with a website.
What is Plymouth Create?
Plymouth Create gave all Plymouth State University active account holders access to free web hosting and domains. These digital spaces can be used to secure a public place on the web where you can share your work, interests, and ideas.
Why Should I Make a Plymouth Create Website?
Whether you’re faculty, staff, or a student, Plymouth Create has something to offer. A Plymouth Create site can be an easily accessible portfolio for potential employers, clients, and more. Plymouth Create also gives users a place to form their digital identities. In an age where everything is online, and accessible at our fingertips, it is important to have an online presence that shows the nuances of your skills, personality, and interests.
How Do I Get Started?
Please note, the new service usnh.domains is now available (starting August 2023). To get started, please visit usnh.domains if you would like a domains account starting August 2023 and later. Simply go to the Plymouth Create Homepage and click “Get Started” to choose a domain name and begin building websites tailored to your needs. Through the web hosting provider Reclaim Hosting, Plymouth Create allows users to build WordPress sites, wikis, forums, and more. For a full list of available applications, see Available Applications in Installatron.
If you are brand new to website development consider visiting our Beginner’s Guide.
What Happens When I Graduate?
After graduation, you may want to hold on to your websites and data. You can migrate your domain from Plymouth Create to Reclaim Hosting after leaving PSU to retain your sites. For more information on domain migration, see Exporting from Plymouth Create, or begin the migration process by selecting the Migration option at the top of Plymouth Create after logging into your Plymouth Create account.
Introductory Video
Signing Up
2023 Updates
Please note, the new service usnh.domains is now available (starting August 2023). To get started, please visit usnh.domains if you would like a domains account starting August 2023 and later.
Reviewing the Guidelines
Before you get started, we recommend that you review our information about Choosing a Domain Name.
The Sign-Up Process
Once you’ve reviewed the guidelines, you can proceed to the sign-up page.
Click the “Get Started” Button:
You will be redirected to login for verification. You will then use your USNH username and password to log in:

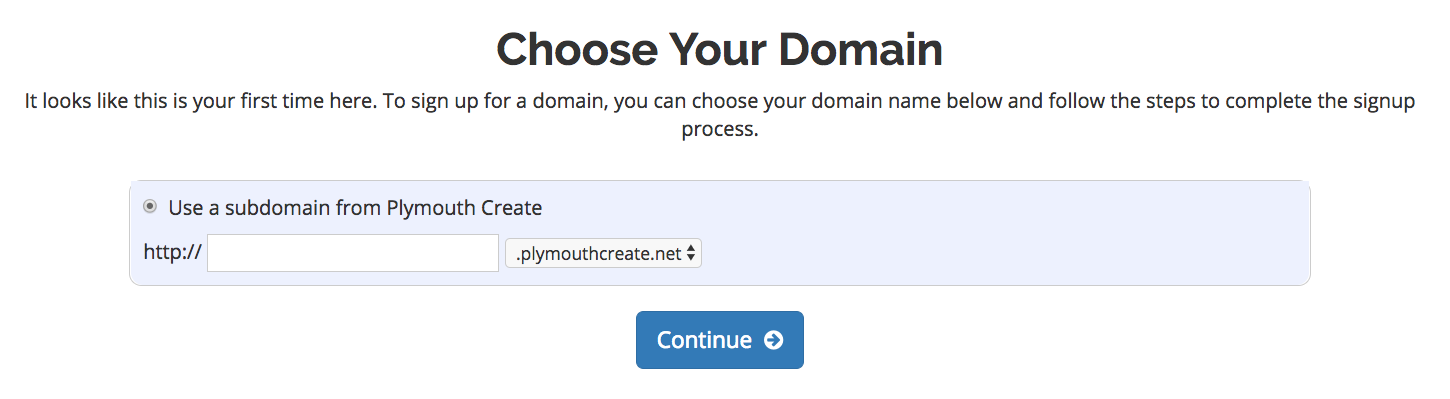
Enter the subdomain name you want for your PlymouthCreate website. When you’ve found an available subdomain, click the button labeled Click to Continue.
Creating Your Free Subdomain

Review your subdomain and contact information. It should be your first name, last name, and PSU email. Click Sign Up.

After you click Sign Up, you will see a page letting you know that your domain is ready. You will then be redirected to the cPanel where you are on your way to creating your own PlymouthCreate space.
If you are not redirected for any reason click on Dashboard after you’ve completed the initial process and you should be redirected to CPanel from there (i.e. the interface for building your new website).
Choosing Your Domain Name
Choosing your domain name is the first step in getting started with staking your claim on the web. Your domain name is a unique Web address (e.g. yourname.plymouthcreate.net) that can be used to build out your own digital presence. As you make your choice, there are a few considerations to keep in mind:
Your Domain Name Must Be Available: Domain names must be unique, which means in order for you to claim your own, you need to be sure that it is currently available (and not being used by any one else at PSU). There are lots of tools to check on domain availability, and when you sign up on plymouthcreate.net, we’ll actually check the availability of your choice for you. All PlymouthCreate domains contain “.plymouthcreate.net,” but when you leave PSU, you can migrate your website to another hosting account or company.
Choose a Domain You Can Live With: You should choose a domain name that you feel you can live with for quite some time. You should pick something that you won’t find embarrassing in the future. A good rule of thumb is to pick a domain that you would be comfortable putting on a future job application.
You May Wish to Include Your Name in Your Domain: There is no requirement that your domain reflect your specific identity in the form of your first and last name. However, choosing a domain name that includes your name may make it easier for you to achieve higher rankings in search engines when someone queries your real name.
Pick a Domain you Like: At the end of the day, your domain should reflect you. Pick a domain you like and are proud of. It can reflect your interests, sports you play, or your hobby. Or it could just be your name. The “right” domain for you is the one you’re comfortable with.
Understanding Accounts & Passwords
One aspect of plymouthcreate.net that users may find a bit complicated at first is understanding the different accounts (and associated passwords) that you can manage as part of your participation in the project. This article outlines the types of accounts that you are likely to have, what they are for, and how you go about resetting passwords on each of them.
Your cPanel Account
When you first sign-up for your domain and hosting, a cPanel account will be generated that provides you with access to your slice of the plymouthcreate.net Web server. Your cPanel account is automatically associated with your USNH User ID. Therefore, your USNH User ID will grant you access to your cPanel account.
Your Application Administrator Accounts
Every time you install a new application in cPanel, an Administrator Account for that application will be created. You will likely use these accounts very often – every time you need to login to your application to manage the associated Website, you will use this account.
For example, if you install WordPress to manage your Website, every time you need to add content to WordPress, change your theme, approve comments, etc. you will use this account to login.
Usually, you will be given the opportunity to choose the username and password for that account. We recommend choosing something that you are likely to remember but that is strong and secure.
Upon installation, you will likely receive an email confirming the user-id/password combination you chose. It will also have information about how to access the login page for that application. You may wish to make sure you don’t delete this message.
Depending on the application you’re working with, managing and resetting the password for this account will vary. If you’ve used Installatron (in cPanel) to install the application, however, you can always review the account credentials:
- Login to cPanel through https://plymouthcreate.net/dashboard/
- Click the My Apps in the Software section
- Click the Edit button (this looks like a blue wrench).
- Scroll down to find the Administrator Username and Password.
In addition, most applications should have some kind of password reset link on the login page.
Other Types of Accounts
In addition to the three account types outlined above, there are a few other kinds of accounts you may have as part of plymouthcreate.net:
- FTP: If you set up FTP on your account, you will need to set up an account.
- Application User Accounts: In addition to the Administrator Account that you set up when installing an application, most applications will also let you set up user accounts.
Video Tutorials:
WordPress Login Credentials:
Privacy
What you put up in your plymouthcreate.net space rests entirely with you. You can choose not to pick a domain that reveals your name. You can use a pseudonym on your actual site. However, when you sign up through the default process, your name does get published as part of the public record about your domain name. Anyone can find it by looking up details about the ownership of that domain name through a public “Whois” request.
This is NOT an issue if you’re already planning on using your name openly on your site (in your domain name or elsewhere). This option is aimed, specifically, at those who, for whatever reason, feel they want to take every precaution to hide their identity on their site.
What Can You Do with Your Account?
Your ability to do things on Plymouth Create is dictated to a large degree by the limits of your imagination. That said, there are some technical requirements and limitations that you should be aware of and might want to review.
To spark your imagination, here are some ideas that might help you get started:
Install a Web Application in Your Space
Plymouth Create makes it very simple to install certain Web applications in your Web space. Web applications are just special software that run on a Web server. Usually they allow you to build and manage a Web site. The kind of site you can build depends upon the type of application you install. Here are some examples of applications that you can easily install within the plymouthcreate.net Web hosting interface:

WordPress: WordPress is a blogging application. While it allows you to quickly and easily set up a blog, it also comes with a set of features that really make it possible to set up any kind of basic Web site without much difficulty. We have resources available that are focused on installing and using WordPress.

Mediawiki: If you’ve ever browsed or edited Wikipedia, you’ve already used Mediawiki. It is the open-source wiki software that runs the online encyclopedia, and you can install it on your Web space. It’s a good choice if you’re interested in publishing documents and then collaborating with others on them.

ZenPhoto: This application is a good choice if you’re looking for a way to share images in your Web space. It’s also a quick install through Installatron in cPanel onto your Plymouth Create Web space.

OwnCloud: If you’ve used DropBox, the concept of OwnCloud will be familiar. It allows you to upload and access files from anywhere with Web access. You can also share those files and sync them to your devices. This Web application is another quick install through Installatron in cPanel.
These are just a FEW of the open-source applications that are available to you in your Plymouth Create Web space. We encourage you to read more about what Web applications are and which ones are available to you through this project.
Organize Your Site with Subdomains and Folders
Through this project, you’ve received a domain name that you can actually subdivide and organize anyway you like. One easy way to organize your domain is to create subdomains, in which you can then install other applications. In addition, you can just set up subfolders for your site (which can also have their own applications installed in them). Here’s an example of how you might organize your site (using the subdomain vs. the subfolder approach)
| Subdomain Approach | Subfolder Approach | |
| yourdomain.com (“root”) | Install WordPress as your “main site” | yourdomain.com (“root”) |
| course1.yourdomain.com | Install a second WordPress instance for a course you’re taking | yourdomain.com/course1 |
| photos.yourdomain.com | Install ZenPhoto for a public photo gallery of your photos | yourdomain.com/photos |
| docs.yourdomain.com | Install MediaWiki for a club you belong to that wants to collaboratively edit its bylaws | yourdomain.com/docs |
| files.yourdomain.com | Install OwnCloud so you can access your files on your laptop and at work | yourdomain.com/files |
This is just an EXAMPLE of a way to organize your site and then use different sections to do different things. There is no one solution to this challenge, and what you do should be driven by what makes sense to you. To start, you may just want to install one thing at the “root” of your domain, and then let the rest evolve as you get to know more about what’s possible.
Map Your Domain (or a Subdomain)
If you already have a digital presence that you’d like to pull into your Plymouth Create space, domain mapping is an option you may wish to explore. This allows you to assign your domain (or a subdomain) to another service. Some services that work with domain mapping are:
When you map a domain, users who visit your URL will automatically see your space on one of these services. It’s a great way to incorporate your activity elsewhere into your domain, and it might be a good first step if you’ve already established a presence somewhere else and just want to point your new domain to that space.
Registering a Domain
Plymouth Create currently utilizes subdomains of .plymouthcreate.net for the initial signup, however after using your space you may decide you’d like to register a top-level domain (a .com, .net, .org address). You can do this by registering a domain with a service provider (we make a recommendation below, but any domain provider should work) and adding it to your space as an Addon Domain.
To start you’ll need to get the domain registered. When choosing a domain we recommend keeping it all lower-case, avoiding hyphens, keeping it short, and of course it will need to be a unique address. Reclaim Hosting has made the process of registering a domain quite simple, and the domain will work with very few additional steps due to the integration they have with our hosting system. To register a domain you would go to https://portal.reclaimhosting.com/cart.php?a=add&domain=register and type in the domain you’d like to purchase:

After ensuring the domain is available for purchase you’ll be prompted to select whether you’d like to protect the contact information associated with the domain. All domain registrations are required to have valid contact information publicly available, however a proxy service to protect your identity is available for an additional fee. You can read more about this service, ID Protect, at https://support.reclaimhosting.com/hc/en-us/articles/1500004804362-ID-Protect-WHOIS-Data-Protection-FAQ

You’ll also be prompted for nameservers for the domain. If registering the domain through Reclaim Hosting you can leave these with the default. If registering the domain elsewhere you’ll want to point the nameservers to ns1.reclaimhosting.com and ns2.reclaimhosting.com in order for the domain to work with our system.

Once you’ve completed the checkout process with payment information the domain will be registered automatically. The last step is to add it to your existing account here at Plymouth Create. To do that you’ll log into your account at https://plymouthcreate.net/dashboard and in cPanel navigate to Domains

Here you will type in the domain that you registered previously to host it within your space on Plymouth Create. cPanel will also setup a subdomain which you can leave with the default that it creates and verify a location for the files for the domain (typically a folder inside of public_html). The option to create an additional FTP account is present but not necessary. Follow the below steps to get your Addon Domain set up.
- Click Create a New Domain. A new interface will appear.
- Enter a fully qualified domain name in the Domain text box.
- To create a new domain, enter the new domain name. For example,
example.com. - To create a subdomain, enter a new name followed by a period (
.) and then the website’s domain. For example, entersubdomain.example.comto create a subdomain ofexample.com.
- To create a new domain, enter the new domain name. For example,
- Optionally, you can specify the directory where you want the files for the domain to exist (the domain’s document root). To create this directory, deselect the Share document root with “example.com” checkbox, where
example.comrepresents your main domain. You cannot create a document root outside of thepublic_html/directory.
At this point the domain will now be hosted in your account and you can use it to install software, upload files, and any number of other actions available to you in cPanel.
What Exactly is a Web Application?
In the most general terms, a Web application is a piece of software that runs on a Web server. A Web server is a just a specialized computer designed to host Web pages.
Most Web applications are comprised of two components: files and a database. When you install a Web application, you will need to make sure all of the files are copied over into the appropriate location AND that a database (and database user) has been set up to connect to those files. Often, you will have to do some configuration to make sure the application knows how to access the database.
The system we use for PSU Create uses a special script installer called Installatron (in cPanel) that allows you to automatically install dozens of open source applications. When you use Installatron, you don’t need to worry about moving files, creating databases, or doing the initial configuration. It’s all taken care of for you. You can find out more about Installatron here.
In order to run on the PSU Create server, Web applications must be able to run on a LAMP server, which is the particular kind of Web server that we use. Occasionally, a Web application may require additional components or modules that need to be installed on the server.
Static and Dynamic Websites
Static Websites
In the early days of the Web, almost all Web sites were what is known as 'static sites.' Content (text, images, video, audio, etc), was placed or embedded in a file in which HTML tags were used to format it. If you looked at the actual contents of the file, you might see something like this:

The content and the tags lived side-by-side. To edit the page, you’d open up the file (on your own computer) in a program capable of editing HTML files and make changes to either the content or the presentation. Every page had to be edited individually, even if the edits you were making were for common elements that appeared on many pages (like menu bars).
From a technical perspective, accessing a static Web site is fairly straightforward. When your computer is connected to the Internet, you can use a Web browser to access files on a Web server (as long as you know the address). The Web server delivers the contents of those files to your browser, and your browser displays them.
Dynamic Websites
Over time, as the Web became more sophisticated, new systems emerged for creating and managing Web sites. These moved beyond the model of having content and HTML tags live in a simple HTML page which your browser accessed and displayed. Instead, these systems were Web applications – software that literally runs on the Web server and makes it possible to manage a Web site, often with very sophisticated features. One feature of these applications is that they separate content and presentation by storing most content (your text, images, etc) and data about the site (the title, options, etc). in a database.
On the Web server, the Web application installs files that are written in some kind of programming language. The server reads this code and obeys any requests in it to access data in the database (which lives on a separate server) and displays it according to the instructions in the code.

Essentially, the data for the site (living in a series of tables in a database on the database server) is entirely separate from the actual presentation of the site (living in the code of the programmed files on the Web server). Special software on both the Web server and the Database server enable the two to speak to each other and work together.
One of the benefits of using a Web application is that you usually don’t need to touch (or even look at!) the code in order to make changes to your content. In addition, editing the site usually involves accessing some kind of control panel through your Web browser and filling out a form, instead of having to download and access files in software on your own computer.
Dynamic vs Static Content
Sometimes when we talk about the difference between dynamic and static content we get bogged down in the idea of whether or not the content is “fresh” (dynamic, regularly updated) or “old” (static, never updated). How frequently you update your content has nothing to do with what kind of system you are using to manage your site. You can manage a static Web site (as described above) and update the content every day. You can also have a dynamic Web site (running something like WordPress) and never change the content after you create it.
Generally speaking, it IS easier to regularly update content on a dynamic Web site because the Web application just makes it easier. Sometimes, even when you just want a very basic page or placeholder, it’s easier to install a Web application (and only put up a single page) then to manually create an HTML page and upload it.
A Side Note about Separating Content from Presentation: Style Sheets
Another aspect of separating content from presentation involves the use of 'Cascading Style Sheets' (CSS). These are special files that live on your Web server and are linked to your Web pages. They contain information (written in a special markup language) about how to make elements on your site look. They allow you, for example, to define in a single location what all Level 1 Headings look like on your site. They are an important aspect of understanding how to separate content from presentation, but they’re not really an aspect of the difference between static and dynamic sites. Both static and dynamic sites can use style sheets.
LAMP Environments
When you sign up for plymouthcreate.net, you get space on a Web host that is associated with the project. There are a few things you need to know about the Web host that will make it easier to understand what you can do with your new space.
The Web Server
The Web server is the main computer that is associated with the plymouthcreate.net hosting account. It is literally a computer – a computer that has special software on it that allows it to be accessible via the Web. The files that run your applications, images or video you upload, or any other files you upload into your Web space are stored on this server.
(For comparison’s sake, your desktop or laptop computer, by default, doesn’t allow this; I can’t access files on your computer through a Web browser by default. You CAN actually install Web server software on your own computer, essentially making your files accessible over the Web.)
In order to run, a Web server has an operating system installed and some kind of Web server software. The plymouthcreate.net server runs the 'LINUX' operating system and an 'APACHE' Web server.
The Database Server
In addition to the Web server, there is also an associated database server. This is another computer, but it is configured with software that allows it to host databases. It is also connected to your Web server so that your applications (hosted on the Web server) can retrieve data (from databases hosted on the database server).
Databases come in LOTS of varieties. The kind of database you can use for a Web application depends on the kind of software that’s installed on the database server. The plymouthcreate.net server can run 'MYSQL' databases.
The Programming Language
When you install open-source software on your Web account, it’s going to be written in some programming language. Your Web server has software installed on it that allows it to understand different languages. If you install software that’s written in a language that your Web server doesn’t read, it won’t work.
The plymouthcreate.net server has software installed on it that allows it to understand 'PHP', 'PERL', and 'PYTHON'.
Add it Together: LAMP
If you take a look at all the descriptions above, you can determine that we are running what is known as a LAMP server for plymouthcreate.net:
- Linux (operating system)
- Apache (Web server)
- MySQL (database server)
- PHP/PERL/PYTHON (programming language)
Applications that are written for LAMP environments will, presumably, run on the server. HOWEVER, some applications do require additional extensions or libraries that aren’t included, by default, in a LAMP environment. The applications you can install via Installatron (in cPanel) should work just fine.
What makes LAMP environments special is that all of the component parts are open-source. Linux, Apache, MySQL, PHP, PERL, and PYTHON are all open-source programs or systems. Anyone can download them (for free) and install them. Anyone can also modify them and redistribute them. As a result, there are lots of online resources for using these systems that have been built by their communities of users. But, also as a result, since you’re not paying for these systems, you can’t just call up a company and ask them to fix a problem.
It doesn’t have nearly the same user base as Facebook (though there are about 450 million monthly active users to date) and the way people use it is very different. Twitter (X) has focused on the short status message from the start, before Facebook even integrated the idea into their platform. It’s a conversational platform for interacting with people. It’s used heavily at conferences and many choose this as a social network for really networking with peers and others in their community as well as people they might not ever meet in real life. You can follow as many people as you want and it’s a great way of having a stream of information about “what’s happening” with people and groups you’re interested in. One powerful development of Twitter is that celebrities have begun to embrace it as a way to speak directly to their fans without having the message interpreted through other media and journalism with a slant. The ability to search various topics or hashtags (keywords) and see a running stream of what people are saying about that topic is also a very powerful way of gauging reaction to ideas and events. It’s a great idea to experiment with a Twitter account by signing up, adding a profile picture and information about yourself, following a group of people, and interacting with it daily. While the gratification may not be immediate, it’s one of those social networks where the more you put into it the more you will get out of it.
Embedding a Tweet
In WordPress, you can embed a tweet into a blog post. All you have to do is search for Twitter in the block editor, and then add the URL to the tweet (or you can simply add the Tweet URL). The tweet will be automatically formatted to match what it looks like on Twitter. In addition, viewers of your blog can interact with an embedded tweet, and even “like” it if they are logged into their Twitter account.
Embedding a Twitter Timeline
WordPress allows users to embed their Twitter timeline directly into a website in the form of a widget. Widgets can be placed in several areas of a site, and are easy for viewers to see and interact with from the site’s front page.
See the video below to learn how to embed a Twitter Timeline into a site.
The majority of folks that will read this likely have a Facebook account. With over 1 billion active users it’s by far one of the more popular social networks. Many treat Facebook as a semi-personal space, one reserved for family and friends to share photos and highlights of what’s happening in their lives. Facebook also supports “Groups” for sharing amongst a smaller set of individuals regularly, and “Pages” which are less personal and more public-facing profiles meant for organizations and businesses. There are plenty of applications that make it easy to publish a link to the work you do on your blog and your participation in other networks back into your Facebook profile. In general it’s a good practice and can often lead to interesting conversations with different groups of folks. This practice of publishing elsewhere and then feeding into Facebook is desired over the alternative, using Facebook for all content and then pushing it out to other communities. The main reason for this is that privacy concerns over how different people can view content on Facebook have changed often enough to leave users concerned. There’s also never any certainty of sustainability with any of these social networks (remember MySpace, Vine or Friendster?) no matter how popular, so publishing in your own space and then pushing out to others makes a lot of sense. The key takeaway is that Facebook is a great personal network and can also be the starting point for some of these larger professional discussions should you decide to use it that way.
LinkedIn is the professional resumé of social networks. It mixes the ability to keep an updated resume of where you work and what your accomplishments are with a social aspect of having people recommend you and comment on your work. Most users find LinkedIn helpful not as a day-to-day network they use, but rather when they’re searching for a new job and want to find people they know that might have connections. The old saying “It’s who you know” when finding a job or making a connection is particularly relevant here where those connections can be exposed to you (You know this person who works for the company of one of Bill Gates’ sons, and the VP went to high school with you).
Social Media Summary
As mentioned in the opening paragraph, talking about social media is an ever-changing and moving target and this article can never be truly comprehensive. The goal of Plymouth Create is to have you thinking more critically about where you put your content, not that you don’t participate in these networks which still have a lot of value, but rather that you own the work you create. Facebook, Twitter, LinkedIn, and others all have different audiences and the more places you push your content to, the more opportunities for discussion and feedback you’ll receive. The ability to network with an increased amount of people that isn’t reliant on face-to-face meetings is a powerful change in how we interact on the web and the value of it. As you begin to explore social media the best recommendation would be to choose a space you want to explore and really dive in. Follow as many people as possible, talk to them, respond to their work, and you’re more likely to get responses in return that start to build that sense of community for you.
What are the technical requirements/limitations?
Plymouth Create uses a Web server known as a LAMP server. “LAMP” is an acronym for the technology stack that is installed on the server:
- Linux: This is the open-source operating system that is used on the server.
- Apache: This is the Web server software that the server uses.
- MySQL: This is the database software that the server uses.
- Php/Perl/Python: These are the three programming languages that the server can interpret.
Generally, if you are using applications available to install by default through the plymouthcreate.net server, you shouldn’t need to worry about these technical details. All of the software that is available for installation (in cPanel) meets the technical requirements.
If you’re interested in finding/installing another application (that isn’t available through our automatic installer tool), then you’ll have to be sure that the server can support it. To start with, you’ll want to be sure that the Web application can run on a LAMP server. Check the technical requirements for the application to determine this. You’ll also need to do some research about whether there are any additional services or modules required on the server. Some software may require components that aren’t included in the default installation of the LAMP stack. In that case, contact us with details about what you need, and we’ll see what we can do.
Changing Your Domain Name
If you want to change your domain name it is possible. However, the decision on whether or not to ultimately change the name is based on the discretion of our administrator here at Plymouth State University.
We would highly suggest always choosing a domain name you are willing to keep for your entire time at Plymouth. If for some reason, you do need to have the domain name changed please send an email to helpdesk@plymouth.edu and include your current sites url i.e. myname.plymouthcreate.net, and your preferred name change – i.e. mynewname.plymouthcreate.net
CPanel Dashboard
Introduction to CPanel
Your Web hosting account on plymouthcreate.net is managed through a control panel interface called cPanel. cPanel is an industry-standard tool for managing your domain and hosting. Using this tool, you can do all kind of thing with your Web space including the following:
-
install Web applications
-
create email accounts
-
view and manage files in your space
-
create subdomains
-
create and configure FTP accounts
-
review access logs for your site
-
manually manage and configure databases
Accessing cPanel has become even easier now! All you need to do is login by clicking Dashboard at plymouthcreate.net (with PSU username and Password) and your website’s cPanel will automatically be displayed upon login.
Once you’re logged in, you’ll see the cPanel interface. It is divided into sections, making it easy to locate the different tools and services available to you.
Many of the tutorials on this site walk you through particular tasks in cPanel, but we encourage you to explore on your own, as well.
Installing Applications with Installatron
Installatron is a script installer that allows you to quickly and easily install Web applications to the Web space. By default, when you use Installatron, the application you add will be automatically upgraded whenever a new version is available (and a backup will be kept, just in case).
Installing Applications Using Installatron
Video Tutorial:
- To get started you’ll need to login to your control panel by going to https://plymouthcreate.net/dashboard/.
- Here you’ll login with your USNH username and password.

- Once logged in, make sure to click Manage Your Account and Dashboard you’ll be at the homepage of your control panel. You will need to scroll down until you see a section of the Control Panel labeled “Applications.” Within this section, you will see a link to “All Applications” which you should click. Or, you can type “installatron” (without quotes) into the search bar. When you press enter you will automatically be redirected to the Installatron page.
- When Installatron opens, you will see a list of any applications you’ve already installed. To install something new, click on the Applications Browser button (labeled with a large star).
- A listing of all of the applications you can install be default in Installatron will appear. Browse to the one you want to install, and click the icon.
- After clicking the icon, a page will appear with information about the application, links to resources, and a link to install it.
- Click “Install this application” when you are ready.
- A page will appear with a number of settings you can choose/change. The image below shows these settings; here is a rundown of them:
- Location: You’ll need to choose where to install your new application. You can install it at the root of your domain or in a subdomain (which you need to set up first). In addition, you can place your application in a folder (in either your root domain or a subdomain)
- Version Information: You can choose a version of the application. Generally, we recommend choosing the default version. It is likely to be the most recent, stable release.
- Updates & Database Management: By default, the system is set up to automatically upgrade (and create backups upon upgrading) all applications. In addition, by default, the database will be set up for you automatically. We recommend NOT changing these options.
- Username/Password: An username/password will be automatically generated for you. You can choose to change this, if you like.
- Click Install: After installation, you’ll be taken back to the main Installatron page, with details about the application you just installed. At anytime you can come back here to review the application details, back it up manually, or uninstall it.
To get to your new site, you can click the “website” link. What’s more, with certain applications you can use this space to login to the admin area.
In addition, you’ll have received an email with your username/password and a link to your new site.
Applications Available in Installatron
Installatron, the script installer that is part of the plymouthcreate.net cPanel, allows you to easily install Web applications to your Web space. Below is a list of all of the applications currently available to you through Installatron:
Community Building
- Vanilla Forums
- MediaWiki
- ExtCalendar
- Booked
- WebCalendar
- phpFreeChat
- phpMyChat
- Dada Mail
- PHPlist
- Site Recommender
- FluxBB
- MyBB
- phpBB
- Simple Machines
- XMB Forum
- Elgg
- Oxwall
- Pligg
- GBook
- DokuWiki
- PmWiki
- WikkaWiki
Content Management
- WordPress
- Scalar
- Omeka
- Omeka S
- Drupal
- Joomla
- b2evolution
- Geeklog
- PivotX
- Serendipity
- Textpattern
- Big Picture
- Classic Press
- CMS Made Simple
- Composr CMS
- Concrete CMS
- Contao
- Dimension Calling Card
- Eventually Calling Card
- Get Simple
- Grav
- Highlights Calling Card
- ImpressPages
- Known
- liveSite
- MODx
- Nucleus CMS
- phpwcms
- PyroCMS
- SilverStripe
- Soholaunch
- TRU Collector
- TRU Writer
- TYPO3
- WebsiteBaker
- Chamilo
- Commons in a Box
- Moodle
- efront
- HAXcms
- Mukurtu
- phpMyFAQ
- CakePHP
- Code Igniter
- Coranto
- Laravel
- Nette
- Smarty
- Symfony
- Zend Frame
- e107
- Mahara
- Mambo
- PHP-Fusion
- Subrion
- Tiki Wiki CMS Groupware
- Xoops
- Zikula
e-Commerce and Business
- Magento
- PrestaShop
- OsClass
- Quicksell Classifieds
- Revive Adserver
- FrontAccounting
- OrangeHRM
- Feng Office
- CE Phoenix
- osCommerce
- Vtiger
- Zurmo
- Mautic
- Open Classified
- Dolibarr
- Open Real Estate
- SugarCRM
- Suite CRM
- AbanteCart
- CubeCart
- OpenCart
- Shopware
- WeBid
- Zen Cart
- Blesta
- BoxBilling
- Client Exec
- InvoiceNinja
- phpCOIN
- Simple Invoices
- WHMCS
- Collabtive
- Mantis
- phpMyAdmin
- The Bug Genie
- Help Center Live
- HESK
- Live Helper Chat
- osTicket
- Sales Syntax Live Help
Photos and Files
- Nextcloud
- Piwigo
- Codiad
- GateQuest
- OpenDocMan
- ownCloud
- Power File Manager
- ProjectSend
- Pydio
- Coppermine
- Koken
- Lychee
- TinyWebGallery
- ZenPhoto
Surveys and Statistics
- Aardvark Topsites
- Advanced Poll
- LimeSurvey
- phpESP
- Simple Poll
- Matomo
- phpMyCounter
- Seo Panel
Miscellaneous
- SiteBar
- Wallabag
- YOURLS
- iTron Clock
- WebCards
- OHMS Viewer
- Contact Form
- Form Tools
- phpFormGenerator
- webtrees
- Feed on Feeds
- Freshrss
- selfoss
- Tiny Tiny RSS
- Search Engine Project
Accessing Your Files through the File Manager
Your plymouthcreate.net cPanel includes a File Manager that allows you to interact directly with the files stored in your web hosting account. This can be useful if you want to upload software that cannot be automatically installed via the Web Applications section of your cPanel, if you need to change the name or permissions of a file or group or files, or if you want to edit a plain text file. To access your files via the File Manager, use these steps:
Login to plymouthcreate.net with your USNH username and password, after clicking Dashboard.

Once logged in you’ll be at the homepage of your control panel. The easiest way to navigate the panel is using the search feature in the top right panel. Click the Search box and type “File Manager” (without the quotes). When you press enter, you will be automatically redirected to the File Manager. You can also find its icon under Files.
On the left side of the “File Manager” window, you’ll see a navigation menu containing the file structure of your webhosting account. More information about the contents of these files and folders can be found in the “File Structures and the File Manager” documentation in this knowledge base.

In the navigation menu, choose the public_html option. This will take you directly into the folder that contains the files associated with your website(s).

You’ll notice your current location (the public_html folder) is bolded and highlighted in this menu. Click the [+] (expand) icon next to a folder to see what subfolders it contains, or click on the name of the folder to view all of its contents in the file browser on the right side of the page.
You can also navigate through the folders in your account by double-clicking on them in the file browser on the right side of the “File Manager” page.

To select an item, click once on its icon in the file browser. You can also use the “Select All” button above the file browser, or your computer’s keyboard shortcuts (Shift, Command, Control, etc), to select multiple items from this list.

Depending on what you have selected, different options will be available to you in the action menu across the top of the “File Manager” page. If you have selected a folder, for example, you can “Rename” it or “Change Permissions” on it, but do not edit it using the Code Editor or HTML Editor.

If you know exactly what location you want to skip to within your webhosting account, you can type it into the box directly above the navigation menu and click Go.

Alternatively, if you know the exact name of the file or folder you are looking for, but not its location, you can use the Search box to find it.
File Structures and the File Manager
Web hosting is, at it’s basic core, files and folders on a computer that is connected to the internet and setup to distribute them. How that computer (typically a server) is setup to do that is covered more in LAMP Environments but this article will explain the idea of the file structure and how it relates to what you view on your domain.
When you signed up for your domain a web hosting account was created. Although you typically will interact mostly with the web interface to create subdomains, install applications, and other common tasks, you might occasionally also need to work directly with the files in your account. The File Manager in your cPanel is one way to see these files. You can also create an FTP account in cPanel and use an FTP program to interact with these files (FTP stands for File Transfer Protocol, and it’s a way of using a desktop client to transfer files to and from your Web server space).
Let’s take a look at the File Manager built into your cPanel to get a better understanding of the file structure that makes up your website(s).
Login to plymouthcreate.net with your USNH username and password, after clicking Dashboard.

On the homepage of your control panel, you’ll have all the various tools listed. You can easily find the File Manager by using the search tool in the upper-righthand corner and typing File Manager.
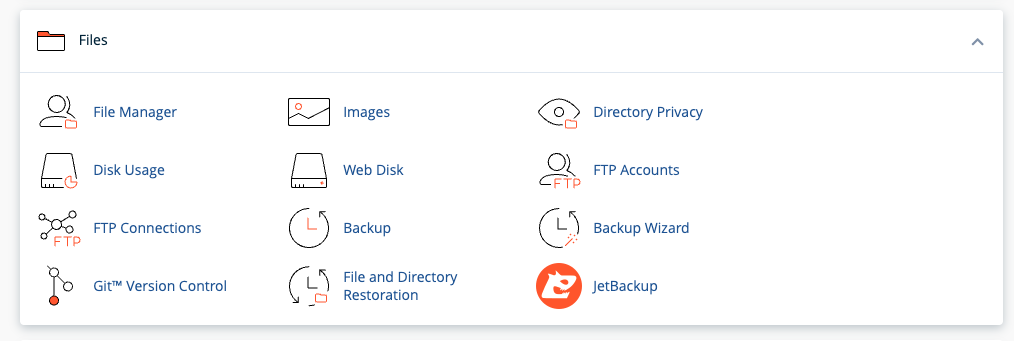
You can also find its icon under Files.
You are now sent to the File Manager and can navigate the folder structure there.
You’ll notice when the File Manager opens up that this looks very much like a folder on your computer. There are a few folders in it as well as files, and you can navigate down into those folders and see what’s inside of them. At the top level of the File Manager, you also have the option of interacting with files and folders you select by moving them around or removing them. There is a larger article all about how to use the file manager at Accessing Your Files through the File Manager so we won’t talk much about how the interface works, rather we’ll cover what those folders and files actually mean and how they relate to what someone sees when they visit your website.
By default, you have a variety of folders at the root of your webspace (the first screen you see when you open up the file manager). Some of them are created automatically to store information about the panel and setup of certain sites. These folders are things like access-logs, etc, ssl, and tmp. You can safely ignore most of those folders because they don’t correspond to actual websites. Let’s look at which folders do and how it all works.
Your main domain, mydomain.com, corresponds with a folder called “public_html.” Whatever files and folders are inside of this folder are available at that domain. If you installed WordPress here you’ll likely see a lot of WordPress-related files within it (which were probably helpfully put there by the automated installer). Let’s say we uploaded an image called mypicture.jpg into the public_html folder. That image would now be available at mydomain.com/mypicture.jpg. The slash after your domain implies “this file is inside this folder”. But what if we had a folder inside the public_html folder? How does that appear? This is typically called a subfolder so let’s put a folder in public_html called “images” and put our image, mypicture.jpg, inside of that folder. What would you type in a browser to get to that file now? The location would be mydomain.com/images/mypicture.jpg. So subfolders are also indicated by a forward slash after a domain.
What about subdomains? You can have completely separate sites called subdomains that appear as nameofsubdomain.mydomain.com. But where are they in the file structure? When you created your subdomain the control panel asked you to give the folder a name. If I had a subdomain called photos.mydomain.com for example, I might want to name the folder “photos” (by default your control panel will call the folder by the name of the subdomain). Folders for subdomains are located inside the public_html folder. So when you go to the File Manager and navigate to public_html you’ll see folders listed for all of your subdomains and once you navigate inside one of those folders you’ll see files and folders specifically for that subdomain that appear on the web at that subdomain’s address.
The File Manager in your control panel is great to view these files and folders, but it can be limiting if you want to upload an entire folder of information to your website. If you find yourself wanting to do more with the files and folders on your webspace you can download an FTP program like Filezilla and connect to your website by creating an FTP account in your control panel (also located in the Websites and Domains tab). An FTP program will allow you to upload and download an unlimited number of files and folders quickly.
Creating an Email Address
Creating an email address in the control panel creates a mailbox on the server for mail to be delivered to. In some cases this might be desired if you want to maintain full control of the email you receive, however in many cases users may wish to simply create an Email Forwarder that sets up a custom email address and sends all mail sent to it on to the address of your choice. This article will show you how to setup both methods.
Login to plymouthcreate.net with your Plymouth username and password when you click Dashboard.
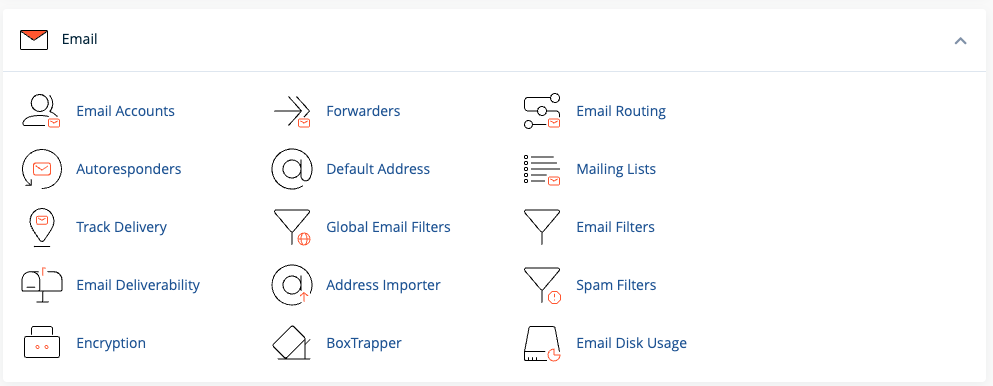
On the homepage of the control panel you will see a section titled Email that contains several tools for setting up email addresses. To get started let’s go to the Email Accounts page.
This screen will allow us to setup an email address that uses a mailbox stored on the server. You will be able to access mail sent to this email address either through a webmail client or a desktop/mobile client directly.
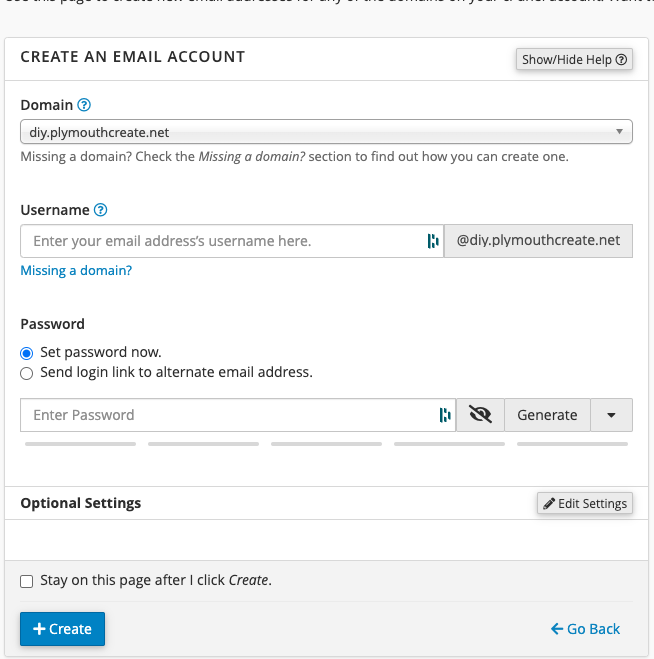
Click +Create. Enter the desired email address as well as a password to associate with that email address. You can choose to set a quota for how large of a mailbox you need, or set this to unlimited (keep in mind your quota will still be dictated by the limits of the hosting account). Once you’re done click +Create.
Your email address is created and it’s ready to be used. You have the choice of accessing it via the webmail options built into your control panel, or setting up a mail client directly from your desktop, laptop, or mobile device. To access these options you can click on the More button.

If you already have an email address you want to use like a Gmail or Hotmail account, you may wish to create an Email Forwarder instead of a mailbox.
Setting up a forwarder is very simple. Start by clicking on Forwarders from the Mail section of your control panel homepage.
The first screen will show you any existing forwarders that you have created. To setup a new forwarding account, click Add Forwarder.

To create a new forwarding account, simply type in the desired email address as well as the email address you’d like all mail to be forwarded to. When you are done click Add Forwarder.

You have now successfully created an Email Forwarder and all email sent to your custom email address will be forwarded on to the address you entered.

Video Tutorials
Create a Self-Hosted Email Account:
Access your Self-Hosted Email Account:
Setting Up FTP
There may be times when you need to place files onto your space on your Web server. There are a number of scenarios when this might be necessary:
- You’re working with an application that allows you to install plugins/extensions, but the files need to be manually moved to the server in order to add them. (Note: This is NOT required with WordPress which allows you to install plugins through the backend in your browser.)
- You’ve developed a custom site/pages using a Web design program, and you need to upload the files you created to the server
- You’re installing an application that isn’t part of the applications in Installatron.
One way to upload files is by using the File Manager that is part of cPanel. However, sometimes you’ll find it easier/necessary to use FTP, or File Transfer Protocol, to move files to the server. This can be particularly useful if you’re working with a Web space where you’re not the owner (so you don’t have access to the File Manager in cPanel) or if you need to provide file access to someone else to your space on the Web server.
What exactly is FTP?
File Transfer Protocol is a method that allows you to remotely move files to a Web server from another location – usually your local/personal computer. Using a pre-defined FTP account (with a username and password), you can configure an FTP client (a program you run on your computer that allows you to transfer files via FTP.
There are lots of FTP clients that you can use; some are free and some are not. A few free ones you might consider:
For the purpose of this tutorial, we’ll show you how to set up FTP in FileZilla, but you should be able to generalize these instructions to use in any FTP client.
Get Information about Your FTP Account
If you’re FTPing to your own space on the Web server, or if you’re setting up an FTP account for someone else to use to FTP to your space, you’ll need to start by getting information about the FTP credentials from cPanel:
- Login to plymouthcreate.net with your Plymouth username and password, after clicking Dashboard
- In the Search Box at the top of the page, search for “FTP”, and click the FTP Accounts icon that appears.
- You’ll have the option to create a new FTP account, or you can scroll down the page to find the credentials for the default FTP account. If you want to create an account, fill out the Add FTP Account form with a username and password. By default, the new FTP account will be limited to a directory with the same name as the account you’re creating. You can change this to a different directory, if you want to grant this account access to a different location. NOTE: Make sure you know/remember the password you enter. When you’re done, click Create FTP Account.
- Once you’ve created the new account, you’ll see it appear in the list at the bottom of the FTP Accounts page. In addition to any accounts you’ve created, in the Special FTP Accounts section, you’ll see the default FTP Account. You’ll know this account because the username corresponds to your cPanel username. This FTP account has full privileges to access any space on your Web server.
- For whichever account you need credentials for, click the Configure FTP Client link.
- Write down the username, server, and port information that appears. You will need to use this (or you will need to provide this to the person you are giving FTP access) along with the password you created in Step 3 in order to configure your FTP client.
Configure FTP in Your FTP Client
Below are links to tutorials for setting up both FileZilla and CyberDuck to connect to you FTP account.
Setting Up Subdomains
A subdomain is one way of organizing and separating content on your site. To create a subdomain, use the following steps:
Login to plymouthcreate.net with your Plymouth username and password after clicking “Dashboard”
Once logged in you’ll be at the homepage of your control panel. The easiest way to navigate the panel is using the search feature in the top right panel.
Click the Search box and type “subdomains” (without the quotes). When you press enter, you will automatically be taken to the Subdomains page. Or, you can scroll down and click the Subdomains button on the cPanel.

Choose a name for your subdomain and type it into the Subdomain box. Just like top-level domains (e.g. johnsmith.plymouthcreate.net), subdomains can only contain numbers, letters, and hyphens, and the best subdomains are simple, short, and descriptive.
Once you’ve typed in a name, cPanel will automatically populate the Document root field for you. This will create a folder to contain your subdomain’s files. You’ll usually want this folder to match the name of your subdomain, so it’s easy to identify where different files live in your account. You might want to change the document root if you already have a folder in your account that has the same name as the subdomain you are trying to create, although this should be rare. Once you’re done, click Create.
If everything went well, you should see a message that your subdomain was created successfully. Your subdomain will now be available as an option for the automatic installation of various software (WordPress, MediaWiki, etc). If you prefer to install web applications manually, you can do so in the document root (folder) you created in step 5.
Please see this support video to follow the process on subdomains.
Subdomains are a nice option when you are tasked with creating sites for two or more separate classes. If you need assistance setting up subdomains, please contact helpdesk@plymouth.edu.
Subdomains vs. Subdirectories
When you’re first getting started with a new space on a new Web host, you might think of yourself as owning a small “territory” of the Web. Everything you place in your public folder on the server becomes available for anyone on the Web to see (assuming they know the address of your site and the files you’ve placed there).
If you’re just putting up a handful of static, HTML pages that you want to make available to colleagues, friends, or family by sending them links, then working with this large, unorganized space may work. But as soon as you get to the point where you want to organize your site, you’re going to need a new strategy.
Consider this scenario: you want to have a personal blog on your new Web space, where you share pictures and short written pieces with family, friends, and colleagues. In addition, you’re working on a large research project that requires you to build a Web-based repository of digital images related to your discipline. You want to use one application (say, WordPress) to manage your personal blog. For your research project, you’ve settled on another open-source application (Say, Omeka). Both of these are applications that need to be installed on your Web host, but you can’t just put them both at your main domain name – if you did, both sites would quickly experience conflicts and errors. You need to cordon off separate spaces for your different Web “properties.”
There are two primary strategies for parceling up your Webspace. You can create subdomains or subdirectories. But before you can understand the difference, you need to first understand what we mean when we talk about your root domain.
Root Domain
Let’s say you’ve registered a new domain for plymouthcreate.net called yourdomain.com. Anything that is stored at this core URL is considered to be at the root of your domain: Nothing comes before the address or after the address. You can certainly decide that you simply want to have a single site on your Web host (say a blog running WordPress), and you can set that blog up at your domain’s root. To get to your site in this scenario, users would simply go to yourdomain.com.
Subdomains
When you want to do more than just have a single site at the root of your site, you need to decide now to organize your space. One way to do so is by setting up subdomains.
You’re already familiar with the concept of subdomains, even if you don’t know it. When you’re looking at a university’s library Web site, say the site for Lamson Library at http://library.plymouth.edu/, the URL is no longer just plymouth.edu. Now the root of the URL is library.plymouth.edu, indicating that you’re on the part of the site that is dedicated to information on the Lamson Library.
As you can see the domains serve two purposes: they help to organize the site from a technical perspective, but they also serve as indications to the users that they are in a new/different space.
As you work on your site, you’re welcome to create as many subdomains as you like, and in each subdomain, you can actually create a distinct, individual Web site.
Subdirectories
The alternative for organizing your space is to simply set up subdirectories. These function much like file folders on your computer. Instead of creating a blog at blog.yourdomain.com, you would place it in a subdirectory called “blog” making the address yourdomain.com/blog. Setting up a subdirectory is really easy. You can create folders on the fly when installing applications (like WordPress), and you can also manually create them in your file browser.
There is one particular issue you need to be aware of. Let’s say you’ve installed WordPress to be your primary blog at yourdomain.com. Later, you decide you want to create another image gallery site on your site, and you want to place it at yourdomain.com/gallery. But, if for some reason you’ve already created a page on your WordPress site called “Gallery” then the url yourdomain.com/gallery will already be taken. If you try to create a subdirectory of the same name, you’ll get a conflict and errors.
Tips & Review
- Subdomains are generally a cleaner, more elegant solution to organizing your site. You’re less likely to get conflicts or errors. However, when using subdomains the process is slightly more complicated: You must create subdomains first, before you can install anything in them.
- Subdirectories don’t create as pretty URLs as subdomains, but they’re easier to set up. They can, however, result in conflicts with existing Web pages.
- As soon as you create subdomains or subdirectories to organize your site, you need to consider how people are going to find them. If you’ve created a new primary blog at blog.yourdomain.com, and someone goes to just yourdomain.com, they won’t see that new site. It is possible to set up redirects to avoid this issue. You can also always create links from pages on one subdomain of your site to another.
- If you really just need one site, sometimes installing at the root of your domain is the easiest thing to do, at least as you’re getting started. You can always add more pieces to your territory later with either subdomains or subdirectories.
Tutorials
Add-On Domains
Every user of Plymouth Create is assigned a “.plymouthcreate.net” subdomain URL at account creation. If users want to use a different domain for the site(s) they create on Plymouth Create they can purchase a domain name separately and activate it via the “Addon” feature in cPanel, which is seen below.

When You Leave (Migration Options)
You will lose access to your PlymouthCreate domain as early as 30 days after you graduate (or otherwise discontinue) from Plymouth State, so it’s essential that you back up your site content prior to leaving campus. You have a number of options: pay Reclaim Hosting $30/year to keep everything and migrate to your own domain, download your entire site to store on your computer, or move everything over to another hosting provider.
Using Reclaim Hosting
Video Tutorial:
PlymouthCreate is hosted through Reclaim Hosting, a company that started out of the University of Mary Washington. Through our special partnership with them, you’re eligible to have your domain and content automatically migrated to a full hosting account at a 10% discount. Just sign up for your own domain and they’ll do the migration for you. You won’t have to provide any login information since they control the servers on both sides. We have this migration option built right in to PlymouthCreate, but you can check out their website for more information: Reclaim Hosting Migrations
To sign up for your own Reclaim Hosting domain:
1. Login to plymouthcreate.net
2. In the top navigation menu, go to Manage Your Account, then Migration Information

3. Click Get Started in the Migration Offer box.

4. You will be given the option to 1) register a new domain, 2) transfer your domain from another registrar, or 3) use your existing domain and update your nameservers.

If you haven’t purchased hosting from somewhere else, the Register a new domain option allows you to get your own personal domain with Reclaim Hosting (outside of PlymouthCreate). Your site will no longer be located at “yoursite.plymouthcreate.net” and you’ll be able to purchase a new URL.
If you have purchased (or intend to purchase) a URL from a different hosting company, but still want your site to be hosted with Reclaim Hosting, select the I will use my existing domain and update my nameservers option. Your site will be migrated to a personal Reclaim Hosting account, but then you will have to update the information that tells the other hosting company (that you got your URL from) where your site is located. It’s possible to get your hosting and URL from two separate companies, but it’s often easier and cheaper to get them together.
If you already have a site that’s hosted somewhere else, and want to transfer everything to a personal Reclaim Hosting account, select Transfer your domain from another registrar.
5. Once you select an available domain (consider using your name for a professional site), we recommend adding on ID Protect by checking the ID Protection checkbox.

6. On the next page, you’ll see an order confirmation and you’ll then be required to enter your account details to officially purchase your hosting plan.

Downloading a Backup of Your Site
Video Tutorial:
If you’re not sure what you’d like to do with your website or content, you can download a full backup directly from your cPanel. This would also be the route to take if you’re migrating your site to a hosting provider other than Reclaim.
1. Log into cPanel.
2. Head to the Files section of cPanel, click on the Backup icon.

3. Under Full Backup, click Generate/ Download a Full Website Backup.

4. On the next page, select the Home Directory option from the Backup Destination drop-down menu.
5. For Email Address, select whether or not you wish to receive an email notification once the backup is complete. (You may also change the notification email address in the provided field if you wish.) Click Generate Backup.

6. Consider storing your backup in multiple places, like on a flash drive, on your computer’s hard drive, and also in a cloud-based account.
7. Contact your new hosting provider for instructions on how to transfer your content.
WordPress
If you would like to move your WordPress site from your Plymouth Create account to either a free WordPress.com account or a different paid host, you can do so with the export system built into WordPress. Please see Exporting from WordPress.
Domain Management
What is DNS?
Remember back before everyone had computers that fit in their pocket, how companies would ship a book full of phone numbers to your doorstep? We might have known who we were looking for, but we needed to look up phone numbers unless they were your crazy relatives that you learned to memorize. When you get your own domain name, by default it’s nothing more than a shortcut, an address, or (to fit this very imperfect analogy) a phone number. When you type a domain name into the address bar of your browser, someone has to identify it and tell it what to display. That’s where a name server comes in.
A name server is a computer, running as a server, that keeps a record of all the domain names that are associated with it and keeps track of where those domains should go. In the case of plymouthcreate.net the name server is the same computer that runs the hosting. You can peek behind the hood and see this in action by going to the 'Websites and Domains' tab of your panel account and clicking on 'DNS Settings'. You see, DNS stands for Domain Name System and the name server on plymouthcreate.net gives control to it to identify what should be displayed when someone types in your domain. Consider the fact that you might have one or more subdomains in your account. The name server and DNS are able to identify those subdomains and let the world wide web know that they exist and point to some files/folders on a computer somewhere.
When you signed up for a domain through the plymouthcreate.net system your name servers were chosen for you. So when people type in your address, the server responds with information about your account. When you migrate an account away from one hosting platform like plymouthcreate.net and onto a new service, it will require you to change the name servers so that your domain name points to a new server with its own files and structure. It’s also possible to have subdomains that point to entirely different servers than plymouthcreate.net. For example, you could have a subdomain that looks to Tumblr for files.
What is a subdomain?
A subdomain is one way of organizing and separating content on your site. You’re already familiar with the concept of subdomains, even if you don’t know it. Consider PSU’s public Web site at http://plymouth.edu.
As you browse parts of that site, you’ll notice that the domain changes. When you’re looking at your department Web site, the URL is no longer just plymouth.edu. Now the root of the url is campus.plymouth.edu, indicating that you’re on the part of the site that is dedicated to internal information at Plymouth State.
If you browse to the library information pages at http://library.plymouth.edu, you’ll notice that the domain changes again, this time indicating that you’re in the library section of the PSU site.
As you can see the domains serve two purposes: they help to organize the site from a technical perspective, but they also serve as indications to the users that they are in a new/different space. As you work on your site, you’re welcome to create as many subdomains as you like, and in each subdomain you can actually create a distinct, individual Web site.
Additionally, we have resources that demonstrate setting up subdomains and illustrate the difference between subdomains and subdirectories.
What is Domain Mapping?
Domain mapping, simply put, is deciding where visitors should be directed when they visit various pieces of your website. Domains and subdomains can be mapped directly to folders located within your web hosting account, where you may have installed WordPress, Omeka, MediaWiki, or other web applications. Domains and subdomains can also be mapped to some third-party providers.
Map Your Domain to Blogger
Mapping your domain is an important part of plymouthcreate.net; it reinforces the idea that you don’t necessarily need to host all your own applications. You should, however, be mindful of making your web presences part of a domain you control. If you would like to map a subdomain and have not yet created it, use this tutorial on creating subdomains before proceeding. To map your domain, or a subdomain, to Blogger, use these steps:
- Login to plymouthcreate.net with your Plymouth username and password, after clicking Dashboard
- Once logged in you’ll be at the homepage of your control panel. The easiest way to navigate the panel is using the search feature in the top right panel. Click the Search box and type “DNS” (without the quotes). Click on Advanced Zone Editor and you will automatically be directed to the DNS Advanced Zone Editor page. Or, you can scroll down and click on the DNS Advanced Zone Editor button on the cPanel.
- Find the domain, or subdomain, you want to map to Blogger in the list of Zone File Records. Under the Action column, click Edit.

- Leave the Name, and TTL fields set to their defaults. Update the Type drop-down menu to CNAME, and the Address field to ghs.google.com. Click Edit Record when you are done. Keep this window open; you will need it in later steps.

- In a new window, go to the Blogger website, and login with your Blogger/Google username and password.
- From your Blogger Dashboard, find the blog you’d like to use, expand the More Options menu, and click Settings.
- On the “Basic Settings” page, find the Publishing section, and click the Setup a 3rd party URL for your blog link.
- Under Advanced Settings, type the full subdomain or domain you are mapping into the box, leave the Use missing files host? option set to No, then click Save.
- You will be presented with a message that your domain cannot be verified, along with information about your existing DNS entry, and an additional DNS entry that needs to be made. This is normal. Copy the second entry under the Name, Label, or Host entry to your clipboard.
- Go back to the window or tab containing the Advanced DNS Zone Editor in your plymouthcreate.net cPanel. In the Add a Record section, paste the text you just copied into the Name field. This information will be different for each domain. Set the TTL field to 14400, and the Type drop-down menu to CNAME.

- Go back to the window or tab containing the Blogger Advanced settings panel, and copy the second entry under the Destination, Target, or Points to column to your clipboard.
- Go back to the window or tab containing the Advanced DNS Zone Editor in your plymouthcreate.net cPanel. In the Zone File Records section, find the domain you were editing Action for and paste the text you just copied into the CNAME field. This information will be different for each domain. Click Edit record when you are done.

- Return to the window or tab containing the Blogger Advanced settings panel, and click Save.
- If everything was successful, your domain will now appear as the Blog Address. Keep in mind that it may take up to 72 hours for your domain or subdomain to correctly point all visitors to the correct location.
Map Your Domain to Tumblr
Mapping your domain is an important part of plymouthcreate.net; it reinforces the idea that you don’t necessary need to host all your own applications. You should, however, be mindful of making your web presences part of a domain you control. If you would like to map a subdomain and have not yet created it, use this tutorial on creating subdomains before proceeding. To map your domain, or a subdomain, to Tumblr, use these steps:
- Login to plymouthcreate.net with your Plymouth username and password.
- Once logged in you’ll be at the homepage of your control panel. The easiest way to navigate the cPanel is using the search feature in the top right panel. Click the Search box and type “DNS” (without the quotes). As you type, the cPanel page will begin to narrow down results. Find and click on Zone Editor to continue.
- To the right of your domain, click “Manage“.
- Find the domain, or subdomain, you want to map to Tumblr in the list of Zone File Records. Under the Action column, click Edit.

- Leave the Name, and TTL fields set to their defaults. Update the Type drop-down menu to CNAME, and the Address field to domains.tumblr.com. Click Edit Record when you are done.

- Visit the Tumblr website, and login with your Tumblr username and password.

- After logging in, click the Tumblr Settings icon.
- In the right panel, select the blog you’d like to map.
- On the Tumblog you’d like to use, under Username, click the pencil icon to edit.
- Check the Use a custom domain checkbox. Type the name of the domain or subdomain you want to map to Tumblr into the box, then click Test your domain.
- If your domain mapping was successful, you’ll see a message that your domain is now pointing to Tumblr. Click the Save button before leaving the page. Keep in mind that it may take up to 72 hours for your domain or subdomain to correctly point all visitors to the correct location.
Applications
WordPress
Wordpress Getting Started
WordPress is an open-source blog application. WordPress forked from b2/cafelog in 2003, and WordPress Mu multiple website functionality has been integrated since 2010. Today WordPress is the most used blog application powering millions of blogs and being used by tens of millions of people every day.
Installing WordPress
WordPress is an open-source publishing platform that can be used for setting up a blog or website easily. In fact, it’s one of the most popular publishing platforms on the web. Setting up a WordPress install on your own domain can be done by following these simple steps:
Go to plymouthcreate.net click on Dashboard and login with your Plymouth username and password.

Then, scroll down and look under Web Applications, then click the WordPress button.

This page gives you more information about the WordPress software. To begin the install click Install this Application in the upper-righthand corner.

On the next page, the installer will ask for some information about this install. The first thing you’ll want to do is decide where to install it. For example, you could install it in a subdomain you have created by selecting it from the dropdown menu. You also have the option of installing WordPress in a subfolder by typing in the folder name in the Directory field. Click here for more information about subdomains.
Typically when installing we’ll choose the domain i.e. “yourdomain.plymouthcreate.net” and leave the directory option blank.

Under the Version section you will also see options for different WordPress Templates, please see our WordPress Templates page to find out more.
By default the installer will automatically backup your website and update it anytime a new version comes out. While we recommend you keep this option, it is possible to only do minor updates, or turn them off completely. The installer will also create a database for you automatically, but if you’ve already created one for this website you can choose Let me manage the database settings and enter the details.
Finally, you’ll need to create an initial username and password for the WordPress install. Enter that information in the final section and click Install.

The installer will take just a few moments to install WordPress and a progress bar will keep you updated. When it is complete you will see a link to your new WordPress site as well as a link to the backend administrative section for your WordPress site.


Congratulations, you’ve now installed WordPress! Now you can start customizing it with themes, plugins, and more.
Install with a Wordpress Template
We have a few WordPress Templates (aka SPLOTS) available to you when you’re in the need for a website that will come with some basic content already built out for you. Our templates include (as of 2022):
Resume Template 2022 – Use this template if you would like to build a digital resume or e-portfolio.
Blog Template 2022 – Use this template if you would like to make a blog
Portfolio Template 2022 – Use this template if you would like to build a visual portfolio.
Art Portfolio Template 2022 – Use this template if you would like to build an art portfolio.
When you install a template there will be placeholder content you will need to replace/delete. You’ll also want to check out the additional Themes installed for the template, in case you would like a different look to your website.
In order to install a template follow these these instructions:
Select WordPress as your desired application in Installatron.

Click on install this application

Proceed through the standard WordPress install and select your desired domain for your site.

Under version select your desired Template. In this case I’ve selected the Resume Template 2022.

Continue the WordPress Install and be sure to click on + Install when you are ready to install your template.
Please see the video below for another breakdown of how to use WordPress Templates.
Your First Visit After WordPress Install
Once you’ve installed WordPress, you’ll see a view of your WordPress C-Panel page with a few links to your site. In order to edit, you’ll want to click on the hyperlink including wp-admin. The wp-admin URL is your way to login to your WordPress dashboard to begin to work on the backend of your website (i.e. where you create all of your content).

Logging in After Logging Out
You can either use the WordPress username and Password you set up during the install process to go login directly to your website.
You would visit your wp-admin link i.e. “yoursite.plymouthcreate.net/wp-admin”
Then enter the WordPress Username and Password you created when you installed WordPress.
or if you visit plymouthcreate.net and click on Dashboard, you can login from there.
When you see your cPanel Dashboard click on WordPress then My Applications to find your WordPress installations and your wp-admin link. Click on the wp-admin URL to enter your WordPress Dashboard.
You can also click on MyApps from the cPanel Dashboard to find your WordPress installation and wp-admin link.
Getting Started with WordPress - WordPress Dashboard
Getting to Know Your WordPress Dashboard
Now that you have your WordPress installed and running, it’s time to look at some basic settings for your site. The place that you will access the settings for your site is called the Dashboard, and it provides the starting point for accessing all of your site’s dials and knobs.
Video Tutorial:
Getting Started with WordPress - Title and Tagline
General Settings: Title and Tagline
The setting we will look at here is your blog “title” and “tag line”. It is located under Settings > General. Once you’re on the General Settings page, you can give your blog any title you want. You can also give your blog a tagline, which can be a short description of the blog.
When you change the Blog title and tag line, they will show up at the top of your site. Depending on what theme you use, the title and tag lines will show up in various places. In the case of some themes, they might not show up at all depending on whether they allow custom configurations. We won’t worry about that for now. If you use the default theme (currently “Twenty Twenty One”), the blog title and tag line are both in the center-left of what’s called the header of the site.
There are more settings on the General Settings page, such as setting the administrative email account, time zone, date format, etc. Change those to whatever is appropriate for your site and geographical location.
Support Video
Getting Started with WordPress - Writing Settings
With the writing settings, you’ll find some things to consider.
| Formatting | Formatting Convert emoticons like :-) and :-P to graphics on displayWordPress should correct invalidly nested XHTML automatically |
|---|---|
| Default Post Category | Choose a default category for your blog posts. |
| Default Post Format | If you had a default format for your blog posts you’ll find options here. |
| Default Link Category | Blogroll |
Post via email
This setting allows you to post using your email address. This may be useful if for example you’re in a remote place and posting using your cell phone.
Support Video
Getting Started with WordPress - Themes
Getting Started: WordPress Themes
When it comes to WordPress, customizing the look of your site is simple and straightforward. When you install WordPress, the default (or pre-set) theme is called Twenty Twenty-Two (as of WordPress version 5.9). It is a very customizable theme that is built for the block editor. You can read more about WordPress version 5.9. You can read more about theme Twenty Twenty-Two. You can also read about how to use the new Editor in Twenty Twenty-Two here.
In addition to Twenty Twenty-Two, you’ll have other themes available to you. (What themes you have depends upon if you did a default WordPress installation, or if you installed a special package.) If Twenty Twenty-Two doesn’t meet your needs, you can activate another theme on your site or install a completely new one.
Activating Themes
- Start at your site’s Dashboard.
- Navigate to Appearance > Themes.
- You will see thumbnail images representing each of the themes that you currently have available on your site. Simply mouse over any one of them, and click the Activate link.
That’s all you need to do to change the look of your site with a new theme.
Installing Themes
If none of the themes that were provided when you installed WordPress are what you’re looking for, you can always search for and install other themes from the WordPress Theme Repository.
- Navigate to Appearance > Themes.
- Installing new themes is quite simple. You start by going to the Add New Button
- The initial page is the Search Theme page, and it’s not all that helpful (or visual). You can check a few “filter” boxes to see what comes up, but there is a more visual way. Click the Featured link at the top and you’ll get visual (screenshot) examples of other themes you can install. You can also click “Newest” or “Recently Updated”.
- Under the thumbnail picture of each theme (when you hover your mouse over the theme) are three choices – Install, Preview, and Details & Preview. Those choices should be pretty self-explanatory so click Install to add a new theme to your site.
- After you install the theme, it is still not active on your site. You will need to Activate it to use it.
- Once activated, your site will be using the new theme. Visit your site’s homepage to view your new theme.
Getting Started with WordPress - Publishing
Getting Started: Publishing Content
The primary activity that you’re likely to be doing on your WordPress site is publishing content. The content could be text you write, pictures you take, videos or audios (which may be hosted on another site), or other media that you’ve found elsewhere on the Web. WordPress makes it very easy to publish media content of all types, whether hosted on your actual Web server or elsewhere.
Posts vs Pages
Out of the box, WordPress provides two primary content types for you two work with: posts and pages. If you read blogs or have ever written for a blog before, the concept of a post is probably a bit familiar. Posts often are content that appear on your blog in some kind of scheduled way. They usually are presented on your site in reverse-chronological order. Posts might be what you use to share your regular thoughts, reflections, or ideas about a topic. Posts make up a kind of “river” of content that you’re producing as part of your blogging activity.
Pages usually correspond to our more traditional concept of what makes up a Web site. Pages are presented outside of the “river” of content that are posts. They are more likely to stand alone and be organized according to a traditional hierarchy. Pages might be content that is less frequently updated or changed.
If you were using WordPress to build a business Web site with a lot of information content, you would probably use Pages. If you added a feature to that site where you started to advertise special events or news, you would probably use Posts.
A few other things to know about Pages vs Posts:
- If you want your content to be accessible to your users via RSS/syndication, you’ll need to use Posts. By default, Pages do not appear in a site’s RSS feed.
- Categories and Tags (which are used in WordPress to help you organize your content) are ONLY available on Posts. Page organization is done through customizing your site’s menus.
- Okay this get’s a little tricky: WordPress, by default, also creates “Category Pages” and “Tag Pages” that display all the Posts in a category or tag. These are NOT related to the regular Page type.
Media
Upon occasion, you may want to include media (images, audio, video) in your site’s posts and pages. There are generally two approaches to handling media in WordPress:
Uploading: You can upload the files into your site’s Media Gallery and then link to them in your posts/pages. This works very well for images, and when you take this approach for images you have the added benefit of being able to make use of WordPress’ built-in (albeit rudimentary) editing tools. Also, when you upload images to WordPress, it automatically creates different sizes that you can use, as needed.
Embedding: You can embed media from other sites easily in WordPress. Embedding an image just means providing a URL to it’s location elsewhere on the Web. Instead of uploading it to the server, WordPress grabs that image from the external source and displays it on your post/page. However, with this approach you lose your editing capabilities as well as the resizing feature. Embedding audio and video from external sources becomes easier with every version of WordPress it seems. These days, you can embed video and audio from many external services (YouTube, Vimeo, SoundCloud, complete list here) by simply placing the full URL of the audio/video location on it’s own line in your post/page. Our general advice is to use externally hosted media whenever it makes sense and works. This is usually the case when you need to use audio or video; without plugins, well-presented audio and video in WordPress is tricky. For images, if you need to do basic editing and/or require different sizes of images, upload them to your site. Otherwise, consider referencing them from another location (your YouTube account, for example).
Post Formats
WordPress now uses Gutenberg editing to edit Posts and Pages. This is a block-based editing system. You can read about Gutenberg at the link above and you can also read about the functionality of the editor here. Every time you hit the return button, whilst building your site you will have the opportunity to add new types of blocks. Anywhere you see the + button you can pop open the list of block options. You can browse or search for a particular block setting. You can re-organize these blocks and use unique blocks through plugins.
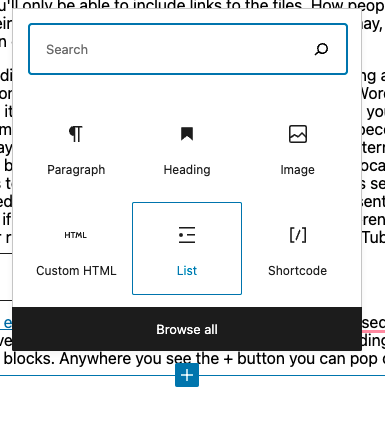
Support Video:
Getting Started with WordPress - Menus
Building Your Custom Menu
Start at your site’s Dashboard and choose Appearance the Menus.


In the Custom Menus interface that appears, type a name for your menu. This can be anything you want. It doesn’t get displayed anywhere; it’s used by WordPress to identify and place your menu. Once you’ve typed the name, click Create Menu.

You’ll now be presented with a screen that includes a section titled Menu Settings. This is where you’ll indicate where you want your menu to appear in your theme. The number of locations available depends entirely upon the theme you choose.
In the example shown below, there are two areas available; we’ve chosen to place the menu in the Top Menu area which we know corresponds to the header menu.
You may need to experiment a bit in order to find out where your menu will appear in your theme. You can always change this location later by coming back here and clicking the Manage Locations tab.

Now that you’ve set up your menu and assigned it to a location, you can begin to add links to it. On the left-hand side of the screen, you’ll see what content is available to add. On the right-hand side of the screen, in the Menu Structure area, you can arrange and organize your links.
By default, you may not see everything that is available to you to add to your menu. For example, posts can be added to menus, but they’re not usually displayed by default.
To make more content available, click the Screen Options tab at the top of your WordPress screen, and then click off the check boxes that correspond to additional content.

To add content to your menu, simply check it off on the left, and click the Add to Menu button.

Your new content will appear on the right, and you can drag items in the order you want them to appear. Drag items to the right to indent them under other items. This will usually make them appear as drop-down items in your menu.

You can add custom links to your menu by clicking the Links section on the left. In the short form that appears, enter your link’s URL, and a text for the link. Click Add to Menu to move it to the left.


Note that you can change the link text of any item you add to your menu. This can be helpful if you have a page with a long title, and you’d like the link to not take up so much space. You can abbreviate the title in the Navigation Label section, and that shorter text will become the actual menu link.
When you are done, make sure you click Save Menu.
Other Notes about Menus
When you add a Category or Tag to a menu, the link will take your readers to an archive of all the posts on your site that use that category or tag. This can be a very useful feature for organizing your content when you’re using posts to share your work.
In addition to assigning Custom Menus to theme areas, there is a default Custom Menu widget that you can put in the sidebar of your site. This is useful for creating smaller, customized navigation for your site.
If you forget to click Save Menu after making changes to your menu location or content, you will lose your work!
Getting Started with WordPress - Discussions
Discussion Settings
What makes WordPress a powerful platform is that not only can you create a dynamic website, but you can also allow dynamic discussions about the content with your visitors. Comments, the bread and butter of the discussion, can add to the overhead of your website management. You have to keep up with responses to your commenters or they will think you aren’t paying attention. Comments also can come, unfortunately, in the form of Spam. We will give you some additional information about dealing with Spam in another section. For now, here’s how to manage your Discussion Settings.
Start at the Dashboard.
Navigate to Settings > Discussion.
The two main forms of discussion on a website are enclosed – “Allow link notifications from other blogs (pingbacks and trackbacks)” and “Allow people to post comments on new articles”.
Comments are self-explanatory. People come to your website, read an article, and as long as you allow comments, people can write whatever is on their mind. Commenters must leave their name and email address (if you leave that setting checked). You can also require users to be registered to your site to comment. They would then need to be logged in to submit any comments. By default you will get an email sent to the admin account of the WordPress site when someone posts a comment, or when a comment is held in moderation. You can uncheck those boxes if you do not wish to receive those emails.
A comment will appear on the article (post or page) only after you approve it. If you have approved a comment author once, they will be automatically approved the next time they leave a comment on your site. If you uncheck the box labeled “Comment author must have a previously approved comment”, then all comments will appear automatically. We don’t recommend this setting.
You also have some control over comment moderation regarding how many links a comment contains (spammers like to put links in their “comments”). You also can filter out words, URLs, email addresses, to hold them in moderation. You can then approve them, spam them, or trash them.
There are also forms of discussion called link notifications. Spammers like these too. Here’s an article on the What, Why, and How-To’s of Trackbacks and Pingbacks in WordPress.
Sometimes it’s nice to have visual representations of the people who are commenting on your blog. These are called Avatars and can be found under Settings > Discussion.
WordPress uses a common universal system of avatars called Gravatars (Globally Recognized Avatars). The system requires you to sign up with your email address. You can upload a graphical representation of yourself (a picture or other graphic). From then on you are identified with your Gravatar on any blog that you use that email address with.
In the WordPress Discussion Settings, you have a few options. Whether to show Avatars at all, the “rating” allowed to be shown, and what the default Avatar will be if a user does not have a Gravatar.
Getting Started with WordPress - Permalinks
Part of the popularity of WordPress is how easily it makes a website functional and yet attractive. One of the smaller details that you might want to adjust is how the addresses to your blog posts are structured. Permalink the name given to the address of an individual blog post because they are “permanent links”. For example, the web address for this sample blog is http://createoutestdomain.com. The link to the first post, titled “Hello World” may be structured in many ways. The screenshot below shows one way.
So http://createoutestdomain.com/?p=1 may get you to that blog post, but it’s not a very informative link. With WordPress, you have many options to form the links to posts, and you can change them to make more sense than question marks and numbers. To change the permalink structure, start by going to the Dashboard.
Next, go to Settings > Permalinks.
As you can see, there are several choices under Common Settings. The Default setting gives us that uninformative “?p=123”. A popular choice is to use the Post name choice, which is a bit more informative. So our post titled “Hello World” will have an address of http://createoutestdomain.com/hello-world.
If you want to have the date as part of the address, you can choose Day and name or Month and name. You can also change the structure of category and tag names under the Optional section.
Finally, when you write a blog post, you have the option of editing the permalink for an individual post. Just click the Edit button (underneath the Title field).
Then type in whatever is appropriate (and hasn’t been used yet). Generally you want to make it as simple and short a word, or words, as makes sense. In the example below, we just added some more words.
Getting Started with WordPress - Reading Settings
Reading Settings – Front Page
WordPress is a very flexible platform for creating full-blown websites, not just blogging sites. This page will show you how to change the “front page” of your website.
As we have said before, WordPress provides two primary content types for you two work with: posts and pages. Posts, as in blog posts, are a somewhat complex form of webpage. Each blog post gets published in reverse chronological order, on the front page of a WordPress site. You write a new post, and it gets published at the top of the front page. Pages, are a more static form of content. They are additional areas to put information that doesn’t change much. So what if you would like to make the front page of your WordPress site based on a page instead of your blog posts?
Start at the Dashboard.
Navigate to Settings > Reading.
Normally, the front page displays your latest blog posts. What we want to do instead is select a Page from the website. Obviously this page has to exist before you can select it. Select the “A static page” radio button and choose the About page from the Front page drop-down menu (an About page was created for you when you installed WordPress).
OK, great. Click the Save Changes button and now you will have the About page as your Front page. Edit it as you see fit and provide a good welcoming page for your visitors. But wait. What will happen to your blog posts? Most people will want them as the “dynamic” part of your site.
First, create a new Page and title it Blog (you can title it whatever you want but Blog is common and descriptive). Leave the page blank (don’t type any text in the edit box) and Publish it. Now go back to Settings > Reading. Under the static page area choose Blog from the Posts page drop-down.
Click the Save Changes button. Now your “home” page will actually display the About page. You will also have a Blog item in your menu (depending on your theme, you may have to customize your page display to see pages).
If you click on the Blog menu item, you will then see your blog posts. Notice the /blog added to the web address.
Support Video
Getting Started with WordPress - Privacy
Basic Privacy
WordPress is a platform intended to allow you to share your thoughts and ideas freely and easily with the world. However, there are options to publish to a more limited audience.
The first way is to limit who can find your website. That is done by keeping search engines, like Google, from seeing (known as indexing) your site.
To do this, we’ll start at the Dashboard.
Navigate to Settings > Reading.
Normally the box next to Search Engine Visibility is unchecked. If you decide to check the box, it will “Discourage search engines from indexing this site.” It will depend on the search engine to honor your “request”. Some search engines will simply ignore it. Obviously this is not a sure-fire way of keeping your blog private.
You also have options on individual posts to keep them private, so that only people who are logged in to your site can view a given post. You can also password protect posts with a password you supply. Choose the Private radio button to keep a post hidden behind the login, or choose the Password protected button and then type in the password you wish to use. Click on OK when you are finished. Then be sure you click the Update button to save your post with the new settings.
There is a plugin called More Privacy Options that allows you to fine-tune privacy settings on your site.
Getting Started with WordPress - Widgets
WordPress Widgets
Widgets are a more advanced feature of WordPress that allow you even more control over the content on your site. In essence, widgets are small containers of content that can be placed in various areas of your site. Where you can place widgets depends entirely on the theme you are using. Many (most) themes include at least one “sidebar” into which you can place widgets. Some themes include additional “widgetized” areas. The best way to find out what areas are available to you is to go to Appearance > Widgets and take a look at the areas listed on the right. Each widgetized area will appear as a box on the right. In the example show below, the theme contains three widgetized areas: Primary Sidebar, Content Sidebar, and Footer Widget Area.
On the right, you will see a number of widgets available to you. WordPress comes with some default widgets. Other widgets might become available when you have a particular theme activated. Finally, some plugins provide additional widgets to you.
Widgets can present all different kinds of information. The simplest widgets allow you to add text to your site. But you’ll also find widgets with many options that you can set to display dynamic content or to interact with other services. Below is a list of the default widgets available in WordPress.
When you’re ready to start using widgets, all you need to do is drag them from the right-hand side of the Widgets interface into the boxes on the left. WordPress will immediately save them, but you may need to set some options
Default Widgets
- Archives: Shows a monthly listing of your posts.
- Calendar: Shows a calendar view of your posts.
- Categories: Shows a list of all of the categories on your site.
- Custom Menu: Shows a custom menu that you’ve set up with WordPress’ Custom Menu interface.
- Links: Shows your links.
- Meta: Shows links to your RSS feed and your login.
- Pages: Shows a menu of all of your pages.
- Recent Comments: Shows the most recent comments on your posts.
- Recent Posts: Shows your most recent posts.
- RSS: This allows you to show content from an RSS feed.
- Search: Provides your users with a search box.
- Tag Cloud: Shows a “cloud” of the tags/categories on your site.
- Text: Shows whatever text you enter.
Getting Started with Wordpress - iOS & Android App
iOS & Android App
You can download the WordPress app from the iOS App Store or the Google Play Store for your mobile device.
When you open the WordPress app, tap Add Self-Hosted Site.
Then, you will be able to enter your WordPress site credentials.
These credentials come from your Installatron page of WordPress. To access these credentials, first open Installatron by accessing the WordPress link on your dashboard under “Applications”:

Then, click the “My Applications” tab:

Next, click the wrench next to your installed instance of WordPress:

From here, you can access your WordPress site credentials. You may consider making these your OUNetID (4×4) login and password to easily remember this information:
With these credentials, enter them into the WordPress App along with the URL for your WordPress website and select Add Site.
On the next page, you will see all of the WordPress websites you have added to the WordPress App. Select the site you just added.
On this page, you can navigate your post, pages, comments, and more! To start a new post, tap on the Pencil Icon.
On this page, add your Title and Content.
You can also edit the properties of text by selecting the text and the different Text Property Buttons.
To view the progress of your post, select the Preview Icon:
When finished, select Publish.
Now when you visit your WordPress webpage, you will see your new blog post!
 installation, is
 Installing Google Analytics on your WordPress Account
The best way to know your audience is through your traffic stats, and this is what Google Analytics provide for FREE. Google Analytics will help you make data-driven decisions by showing you the stats that matter most.
To add Google Analytics to your WordPress site:
1.The first step is to create an account on the Google Analytics site.
2. You will be asked to log in to your Google account.
3. Then, click the sign up button to get started

4. Fill out the form with your information— make sure that your website URL is entered correctly.

5. Read through the optional settings (checking all is recommended). Then, click “Get Tracking ID”

6. Read through Google Analytics Terms of Service Agreement, and click “I Accept”

7. On the next page, your Tracking ID will be displayed along with a disclaimer that you still need to set up Google Analytics on your website. Leave this tab open so you have the Google Analytics information readily available.

8. So that you can view your Google Analytics right in your WordPress dashboard, the next step is to install a plugin called “Monster Insights.” To get started, click on Plugins, then Add New from the WP menu.

9. In the search bar, enter “Monster Insights,” and once you find the plugin, click the Install Now button. Once installed, click the Activate button.

10. Click on Plugins in your WP menu, and you should see the newly activated Monster Insights plugin. Click “Settings” to begin configuring the plugin.

11. Click “Authenticate with your Google Account.”

12. Next you’ll either login or the select the Google account you used to set up your Analytics account. Then agree to the Google settings.
13. Select “All Web Site Data,” tell Google you’re not a robot, and click Complete Authentication.

14. You’ll be taken back into Monster Insights in your WP account. Click Save changes.
15. You can now view basic data in the Dashboard or Reports view of Monster Insights. Remember that you can also go to analytics.google.com to view your full analytics (real-time reports, locations, traffic sources, etc.)
Wordpress Plugins
WordPress Plugins
WordPress has a lot of functionality built-in, but occasionally you might find a specific need that isn’t a part of the default software. To accomplish this, WordPress has a plugin architecture where developers can create plugins that add additional functionality to your site. From simple photo galleries to site statistics, to automatic Twitter and Facebook sharing of posts, there is practically a plugin for whatever you need for your blog (over 23,000 at the time of this writing). To start using and installing plugins just follow these simple instructions.
1. Log in to your WordPress dashboard. 2. From the left side menu locate and click plugins.

3. You will be given a list of all your currently installed plugins.
- From this menu you are able to activate and disable specific plugins by using either the single plugin options located under each plugin name.- Or you may use the bulk action drop down menu to simultaneously activate/disable multiple plugins by checking desired plugins
- Additionally you may also sort through installed plugins using the sorting options above the bulk action menu.
4. To install a new plugin click “Add new” either from the plugin sidebar or the main plugin menu

5. You will then be redirected to a search engine where you can search using general or specific terms to find plugins. – For example searching “photo gallery” brings up various plugins from different developers.

6. Once you find your desired plugin, click “install now,” which will automatically install the plugin and prompt you to activate it now or return to the menu. Click Activate to begin setting up the plugin.


7. After installing your plugin, be sure to visit the developers’ website if you have any additional questions about how the plugin works, as some plugins may require certain codes or other actions to be used properly. The example listed above, NextGEN Gallery, has a “Gallery Setup Wizard” and a getting started video, as well as a standalone menu item that will display after activation.


8. Some plugins will have their own settings page located under the 'Settings‘, other plugins will break out their own menu item on the left-hand side of the Dashboard. The best way to understand how to use a plugin is to make sure you’ve read the documentation available on the plugin’s website as every plugin behaves differently and sometimes it won’t be explicit how the plugin interacts with your website.
Creating Multiple Blogs on one WordPress Site
WordPress isn’t natively built to say support multiple blogs on one site. However, there are ways to make this work. One of the easiest and most efficient ways to create multiple blogs on one site is to make use of Categories, Menus, and Users features that are built into WordPress.
The first thing to do is log into your site and navigate to Posts – Categories. It will be near the top of the left sidebar in the admin pane under the pin icon.
You will see four fields for your Categories on this screen – all of these will impact you being able to post multiple blogs on your one site.

- Name – This one will be the displayed title of the blog (i.e. if you have multiple blogs what will appear in your main menu). If you have Categories indexed by search engines, the archive will bear this title. If not, this name will be for internal use only, though it might display in some themes.
- Slug – Like a Post slug, the Slug for a Category indicates where you can find the category archive. Depending on your permalink settings (under Settings – Permalinks), this could also be part of your post structure.
- Parent Category – The parent category is very important for running multiple blogs on one site. You might run a brand called All Flowers Inc. that will have its own posts, and your blogs might be called Daiseys, A Rose Diary, and Wedding Florals. Each of those would be separate but tied to the main brand. You can also do this for a parent category as a primary blog for a podcast, but use subcategories as season archives. This one is optional, depending on the structure you want.
- Description – The description might not show up everywhere (or anywhere) depending on your theme. But it can be indexed by search engines, and it is good for internal organization if nothing else. Definitely worth putting a Tweet’s worth of info here (i.e. 280 or less characters).
Once completed, the new Categories will appear to the right of the page as a list. Each Parent Category will be listed above its respective children.
Add the Categories to the Navigation Menu
By using Categories, you can now put direct links to the “blogs” in the navigation menu of your site. Navigate to Appearance – Menus and select which menu(s) you want to add the links to.

If you have not yet built a Menu, its a good idea to name your menu something like “Main Menu” and to begin adding important pages and categories to it ( that is again if you want multiple blogs!)
- Find the new Categories under the View All tab if you haven’t used them before.
- Select which ones you want to add to the menu and press the Add to Menu button.
- The Menu Structure will update to include the selections you made.
- Drag the individual blogs you want to be sub-items into place if desired. If they are not indented, they will be top-level items in the navigation.
- Press Save Menu. Menus do not save automatically in WordPress, and this is an incredibly easy step to miss.
With that saved, you will now be able to see the blogs listed separately in whatever menus you created.
When you write a new post – be sure to include it in the Category (i.e. Blog) you want it posted under.
You would go to Posts and Add New on the right-hand side under your Post tab, you will see the new Categories you made (or existing ones) be sure to select the Category you want this particular post added to by checking the box off and making sure to save. This creates the effect of multiple blogs on one site.

Omeka
Installing Omeka
Omeka is an open-source web application that can be used to create and display online digital collections. Developed by programmers at George Mason University, Omeka was designed to be user-friendly, both during installation and setup and during daily usage. To install Omeka, use these simple steps:
-
Login to plymouthcreate.net with your Plymouth username and password, after clicking “Login with Shibboleth”.

-
Once logged in you’ll be at the homepage of your control panel. Navigate to the Web Applications section of the cPanel and find Featured Applications. Then select Omeka.

-
This page gives you more information about the Omeka software. To begin the install click install this application in the upper-righthand corner.


-
On the next page the installer will ask for some information about this install. The first thing you’ll want to do is decide where to install it. If you’re wanting to install Omeka on your main domain, you can leave the directory area empty. If you created a subdomain, you can select it from the dropdown menu. You also have the option of installing Omeka in a subfolder by typing in the folder name in the Directory field. Click here for more information about subdomains and subfolders.
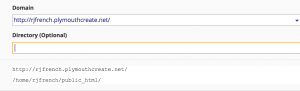
-
By default the installer will automatically backup your website and update it anytime a new version comes out. While we recommend you keep this option, it is possible to only do minor updates, or turn them off completely. The installer will also create a database for you automatically, but if you’ve already created one for this website you can choose Let me manage the database settings and enter the details. Click Install to continue.

-
The installer will take just a few moments to install Omeka and a progress bar will keep you updated. When it is complete you will see a link to your new Omeka site as well as a link to the backend administrative section for your Omeka site. Click the website link to configure your new Omeka installation.


-
When you visit your new Omeka installation for the first time, you will be taken to the site configuration page. Enter a Username, Password, and Email for the administrative superuser (i.e. yourself).

-
Under “Site Settings,” enter an Administrator Email and a Site Title. The Administrator email is the address that messages from the system (e.g. forgot password email reminder) will appear to come from. You might want to create a custom email address using these instructions, for example webmaster@yourdomain.com or omeka-admin@yourdomain.com, to use for this purpose. The Site Title will appear at the top of your visitors’ browser windows.

-
Further down the Site Settings page are several numerical settings; you may leave these at the defaults if you are new to Omeka. When you are done making changes, click the Install button to submit the configuration page and proceed.
-
Congratulations! Omeka is now installed. Use the buttons to either proceed to the Public Site, or to begin adding content, go to the Admin Dashboard.


Installing Plugins
There are a variety of plugins that enable additional functionality in Omeka. All the plugins available for Omeka and their descriptions can be found on this page.
1. Find the plugin, and click the green button on the right to download the zip file.

2. Next, open up your cPanel Dashboard and click on the File Manager. You can find the File Manager under ‘Files’ or by typing “File Manager” in the upper right search bar.
3. Go to the public_html > omeka > plugins folder by clicking on the folder icons in the file menu, or by typing “public_html/omeka/plugins” into the navigation bar at the top and clicking ‘Go’.
![]()

4. Next you will need to upload the zip file you downloaded into the plugins folder. Select the Upload option in the top menu to open up a new tab where you can upload the zip file. When the upload is complete, click the ‘Go back to home/yourdomain/public_html/omeka/plugins’ link at the bottom of the page to return to the File Manager. You will see that the zip file has appeared in the plugins folder.

![]()
5. Make sure the zip file is selected (it should be highlighted in blue), then click Extract from the menu at the top of the page. A small window will open up to confirm where the file will be extracted to. If you were in the plugins folder, it should say public_html/omeka/plugins, if not, type that into the box before you hit Extract File(s).

6. Another window will open that outlines the contents of the file. Just hit the Close button and the installation will be complete.
7. The plugin should now be available in the plugins tab in your Omeka.
Using Omeka
You can learn how to use this application in the official Omeka Support Documentation. This support guide will help you get started and begin creating your Omeka site.
Scalar
Scalar is a content management system with the idea of creating non-linear books on the web.
Installation
Login to plymouthcreate.net with your Plymouth username and password, after clicking “Login with Shibboleth”.
Navigate to the Application section and select Scalar. You can also use the search function as well.

When you click on the Scalar icon, you will be taken to the Scalar information page. Click install this application.

On the next page, fill in the different sections. First in location, decide on the domain or sub-domain for your Scalar site. You can create a sub-domain by following directions in the section Setting up Subdomain. The directory is optional. If you are using a sub-domain, you may not need to use a sub-directory. You can learn more by reading Subdomains vs Subdirectories.
Finally, in Settings, you’ll need to create a username and password for the install. A password can be generated for you, but you should try to create your own. Enter that information in final section and click Install.
Once the installer is finished loading, you will be taken to the My Apps section of the dashboard. Here you’ll find links to login to your install.
Creating a book
To get started in Scalar, you will need to create a book. Log in to Scalar using the username and password you set up during the installation process.
Go to the top right corner and click, Dashboard.
Select the My Account tab and at the bottom of the page type in a title for you book. Don’t worry this title can be changed later if needed. Click Create.
From there you will be able to build your Scalar book. We recommend visiting the Scalar guide (https://scalar.usc.edu/works/guide2/index).
Mediawiki
MediaWiki is an open-source publishing platform that can be used for creating a collaborative document repository. It’s the software that drives the Wikipedia website. Setting up a MediaWiki install on your own domain can be done by following these steps:
-
Login to plymouthcreate.net with your Plymouth username and password, after clicking “Login with Shibboleth”.
-
The next page gives you more information about the MediaWiki software. To begin the install, click install this application in the upper-righthand corner.

-
On the next page the installer will ask for some information about this install. The first thing you’ll want to do is decide where to install it. If you’re wanting to install MediaWiki on your main (the root) domain, you can leave the directory area empty.
If you created a subdomain, you can select it from the dropdown menu.
You also have the option of installing MediaWiki in a subfolder by typing in the folder name in the Directory field.
 (By default the installer will automatically backup your MediaWiki website and update it anytime a new version comes out. While we recommend you keep this option, it is possible to only do minor updates, or turn them off completely. The installer will also create a database for you automatically, but if you’ve already created one for this website you can choose Let me manage the database settings and enter the details.)
 -
Finally, you’ll need to create an initial username and password for the WordPress install. Enter that information in final section and click Install (Note: A default username and password are provided for you.)
 The installer will take just a few moments to install WordPress and a progress bar will keep you updated. When it is complete you will see a link to your new MediaWiki site as well as a link to the back end administrative section for your MediaWiki site.


6. Congratulations, you have now completed the installation of MediaWiki! You can now start to create collaborative documents on your own domain.

Managing Permissions
The default Mediawiki installed has been customized to make it a bit harder for spammers to overwhelm wikis with illegitimate content and comments. This is done by modifying the LocalSettings.php file (a file that is included in every install in which it is possible to provide configurations details).
By default, Mediawiki allows anonymous users to create pages and edit pages in the wiki. The modifications change this in the following ways:
-
Anonymous users cannot edit existing pages
-
Anonymous users cannot create pages
-
Registered users must click the confirmation link in the registration email in order to edit or create pages
This approach should drastically reduce unsolicited content and comments on Mediawiki installations. One further step that administrator might take is to turn registration off after a predetermined amount of time. Users must create accounts by this date; after that, the settings are changed so that registrations are no longer open.
To add this setting, you must edit LocalSettings.php in your Mediawiki install:
-
Login to cPanel and browse to your File Manager.
-
In the File Manager, browser to the folder within publichtml that contains your Mediawiki install. If you installed the wiki at the root of your domain, you won’t need to go any further than publichtml. If you installed the wiki in a subdomain or subdirectory, you’ll need to find the directory that is associated with that space.

-
Locate LocalSettings.php and click the Edit or Code Editor icon at the top of the File Manager.
-
Browse to the bottom of the document, and locate the custom settings that were added during the Mediawiki install and the line “$wgGroupPermissions[‘*’][‘createaccount’] = false;”


Using MediaWiki
You can learn how to use this application at the official MediaWiki Help Pages. This support documentation wiki will show you how to manage all aspects of your wiki, including customizing its appearance, editing content, and changing user settings.
Creative Commons and Public Domain Licensing
Creative Commons and WordPress
On a WordPress site, you may want to add a Creative Commons license. Creative Commons licenses will allow others to share your work, making it more open and accessible. The amount of freedom that others have with your work is dependent on the type of license you select.
The Creative Commons “Choose a License” feature allows users to take a quick quiz to determine what license is best for them. For example, a license that Creative Commons offers is the CC Attribution License (CC BY 4.0). This license will allow others to share and adapt your work if attribution is provided.
Once a license is selected using the “Choose a License” feature, Creative Commons will generate code that can be embedded into WordPress. You can apply a Creative Commons license to a WordPress post or page, or you can apply a Creative Commons license to your entire site.
Adding a Creative Commons License to a Single Work
To add a Creative Commons license to a post on your WordPress site, you will need to embed the license HTML into a block on the post editing screen. To learn how to embed Creative Commons license into a post, see the following tutorial video.
Adding a Creative Commons License to an Entire Site
A widget at the footer of your site is the best way to apply a Creative Commons license. A widget will appear at the foot of every webpage that a viewer navigates to. See the following tutorial video to learn how to place a Creative Commons license into a widget at the footer of your site.
Public Domain and WordPress
Public domain works are free from copyright restrictions. This means that the work can be used by the public in any way and has no attribution requirement.
Through Creative Commons, a work can be placed into the public domain through the “No Rights Reserved” (CC0) license. This license is used by copyright holders who wish to release a work from copyright restrictions. For WordPress, this will typically be the most appropriate license for placing content in the public domain.
It should be added that there is another Public Domain license that Creative Commons offers. This is known as “No Known Copyright,” or public domain mark. This license should not be used by creators who wish to release their own works from copyright restrictions. For that purpose, use the CC0 license.
Adding a “CC0” License to WordPress
To use the “No Rights Reserved” (CC0) license, navigate to the Creative Commons Public Domain page. Under the “CC0” heading, select “use this tool.” This will bring you to a form that will generate code for your WordPress site. See the above videos to learn how to place this code into your WordPress site.
Website Backups
Backing up your website isn’t something to overlook. Having a backup of your WordPress site can help in many situations. When you set up your website, it’s likely you automatically set up backups. There is some documentation on backups and storage on ET&S’ main Knowledgebase.
Backups do take up some amount of storage (remember new accounts get 1 GB of space – to read more about storage see the section titled Quotas) so if automatic backups are turned on, you’ll want to go in and delete old ones from time to time. See the link above for more information.
An example where a backup can be helpful is if you run into an error that breaks your site or an update affects its functionality, you’ll be able to roll back the saved version.
To use backups in WordPress click on My Apps and then My Backups

Click on the arrow to restore a previous backup. Remember – this will be a copy of the site saved at the point in the time noted at the date information on the backup!
The downwards arrow will also allow you to download a copy of the backup.

To delete a backup click the x. Remember we do recommend keeping at least 1 backup of your site around.
This will bring you to a page and just be sure to click the Delete button.

Creating a Manual Backup
To create a manual backup go to your My Applications page. Click on the arrow.

When you’re brought to the next screen make sure to click on Backup. You do get a choice of using your web hosting account or Google Drive for your backup. Note in order to use Google Drive you would have to sync with your Google Drive account.

Turn Off Automatic Backups
If you would like to turn off automatic backups, follow the article on our ET&S Knowledgebase.
Exporting from Plymouth Create
If you would like to export your data from your Create account, either because you are migrating your data or because you are closing your account, there are several options.
If you are leaving the university, you can migrate your domain from Plymouth Create to Reclaim Hosting.
You can also find information on how to export the data from a WordPress installation in order to move it to another WordPress installation or move it to WordPress.com.
Exporting from Wordpress
Exporting
If you would like to move your WordPress site from your Plymouth Create account to either a free WordPress.com account or a different paid host, you can do so with the export system built into WordPress.
From the Dashboard navigate to Tools>Export
It’s probably a good idea to download all your content, but there are reasons you may want to download a partial archive. In some cases, if you will be importing your content into a new site using WordPress.org, your new hosting provider may have a file size limit on uploads. If your export file is too big, you can download a set of partial archives by using the following filters:
- Content published within a time frame – set a Start Date and/or an End Date
- Content authored by specific users. Use the Authors drop-down menu.
- Posts belonging to a specific Category or Tag.
- Only posts or only pages, using the Content Types filter.
- Specific posts Statuses
This process will generate an XML file of your blog’s content. This format, which WordPress calls WordPress eXtended RSS or WXR, will contain your posts, pages, comments, categories, and tags.
Note: This will ONLY export your posts, pages, comments, categories, and tags; uploads and images may need to be manually transferred to the new blog. The current version of the WordPress.org installation gives you the option to import uploaded files, but the blog you are importing from must be live and serving images properly in order for it to work. So, do not delete your blog until after media files have successfully been imported into the new blog.
If you are planning to export your content to another blog platform, it’s best to manually download and save your images from your WordPress.com Media Library to before trying to import/upload them into the new blog.
This information has been adapted from the WordPress support material on exporting a WordPress site. For more information on exporting your WordPress site, please go to the WordPress Support site.
Importing
Once you have exported your posts, pages, etc., you will import them into your new WordPress site.
Login to your new WordPress.com or self-hosted WordPress site and go to the Dashboard. From there navigate to Tools>Import
Choose the WordPress option at the bottom of the list of the services. Next you will see a screen that prompts you to upload the WXR file you generated through the export process.
Choose and upload your file. You will then be prompted to assign an author to the posts that you are importing. You can use this function to assign one author to all posts, or you can manually set the author for each post in the posts menu.
You will also need to reinstall your themes and any plugins that you would like to continue to use.
This information has been adapted from the WordPress support material on importing a WordPress site. For more information on importing your WordPress site, please go to the WordPress Support site.
Quotas
Quota Adjustments
Everyone on Plymouth Create when they sign up receives 1 GB of space on their account. Users can request an increase in their account space quota after they’ve demonstrated that they have taken steps to mindfully steward the space they’ve already been assigned. These steps include:
- Removing unused Web applications
- Removing unnecessary backups. We recommend 1 latest backup per install. If a user wants to maintain more backups they can set up off-site storage of backups or download backups to their own computer/hard drive. In addition, there is a separate backup system that keeps snapshots of the previous 2 weeks of changes to an account that can be accessed by users if necessary.
- Deactivating and deleting unnecessary plugins/themes from WordPress
- Uploading photos/images at optimized sizes. Users may also want to install a plugin like Smush which will compress and optimize files as they are being uploaded.
Users can request increases in 500 MB increments, to do so email helpdesk@plymouth.edu and be sure to review the steps you’ve taken noted above.
Additional Plymouth Create Accounts
Academic programs and projects may request one Plymouth Create account. These must be associated with a full-time employee (faculty or staff) at Plymouth State University (this can be in addition to a user’s individual Plymouth Create account).
Requests should clearly identify the goals for the site to be built on the account and why the user(s) can not achieve those goals using other available systems (.edu. PSU Blogs, SharePoint). In addition, where appropriate, requesters should demonstrate communication with other relevant stakeholders (faculty and staff colleagues, supervisors, etc).
This process can be initiated by emailing helpdesk@plymouth.edu and providing the information listed above.
Course Websites
Web sites for individual courses should be built off of a faculty member’s Plymouth Create account (using subdomains and subdirectories). If this results in exhausting the space assigned to that account, the faculty member should request a quota increase.
Student Organizations and Clubs
Student organizations may request an account if they are an active and approved University club. Student organization accounts must be associated with a full-time faculty or staff advisor.
Further IT Support
If you need further support for Plymouth Create. Please visit our IT Support page for additional support. You can also visit support.plymouth.edu and put in an IT ticket or email helpdesk@plymouth.edu
Creative Commons License
These guides are licensed

Attribution-NonCommercial CC BY-NC
Social Media ↑ Back to Top
As you begin to build out your digital presence you’ll probably start to think about social media in some form. In fact it’s likely that you already have at least one, if not more, social media accounts (Facebook being the most popular to date). Everyone uses social media in different ways, and although it’s often interesting to see people break the boundaries of the “social norms” of a specific online community, this article will focus more on the accepted use cases for specific social networks and how they can help you build your digital presence. This is by no means a comprehensive “How To” of Twitter or Facebook, but a good starting guide to think about where you best fit in to these online communities.